Showing posts with label Shop Project. Show all posts

Sunday, August 23, 2020

Woodworking Project: Horse Table

Let's clear one thing up right off the bat: this is not a table shaped like a horse, nor is it a table for horses. Well, no wait. Actually, it kind of is one of those things. Never mind clearing anything up, let's go back to the beginning.

So, the Silver Fox (fka the War Department) reached something of a milestone birthday this year. But what with the stupid pandemic going on, it was difficult for me to buy something suitably impressive to mark the occasion. After some discussion, we decided that the best thing for her to do was to buy her own present, provided it was something truly special. 

And after a trip to a local artist and metalworker, she found exactly what she wanted.


Originally, my contribution to this gift was to be a shelf above the TV in the living room where this glorious piece of art would live. There was only one problem: we hadn't really counted on the sheer size or heft of the thing. (It's a hair under four feet from nose to "reins" and weighs close to 50 pounts.) A shelf capable of holding it would jut WAY out into the room, and would need some pretty substantial supports to bear the load.

After considering a few options and thinking it over, we decided that the best place for it would be right in front of the railing that separates the living room from the dining room and that, instead of a shelf, I could build a table for it.

Given that this was a special piece, I figured that my usual approach of rummaging around in the wood shed for enough scraps that I might be able to cobble into something resembling a table wouldn't work here. So I hied myself off down to the hardwood supplier and picked up a gigantic chunk of sapele:


I promise I didn't spend more than an hour or two admiring it before chopping it into slightly more manageable chunks and then into various parts and components.


(Yes, I made five legs. One for practice, and four for realzies.)

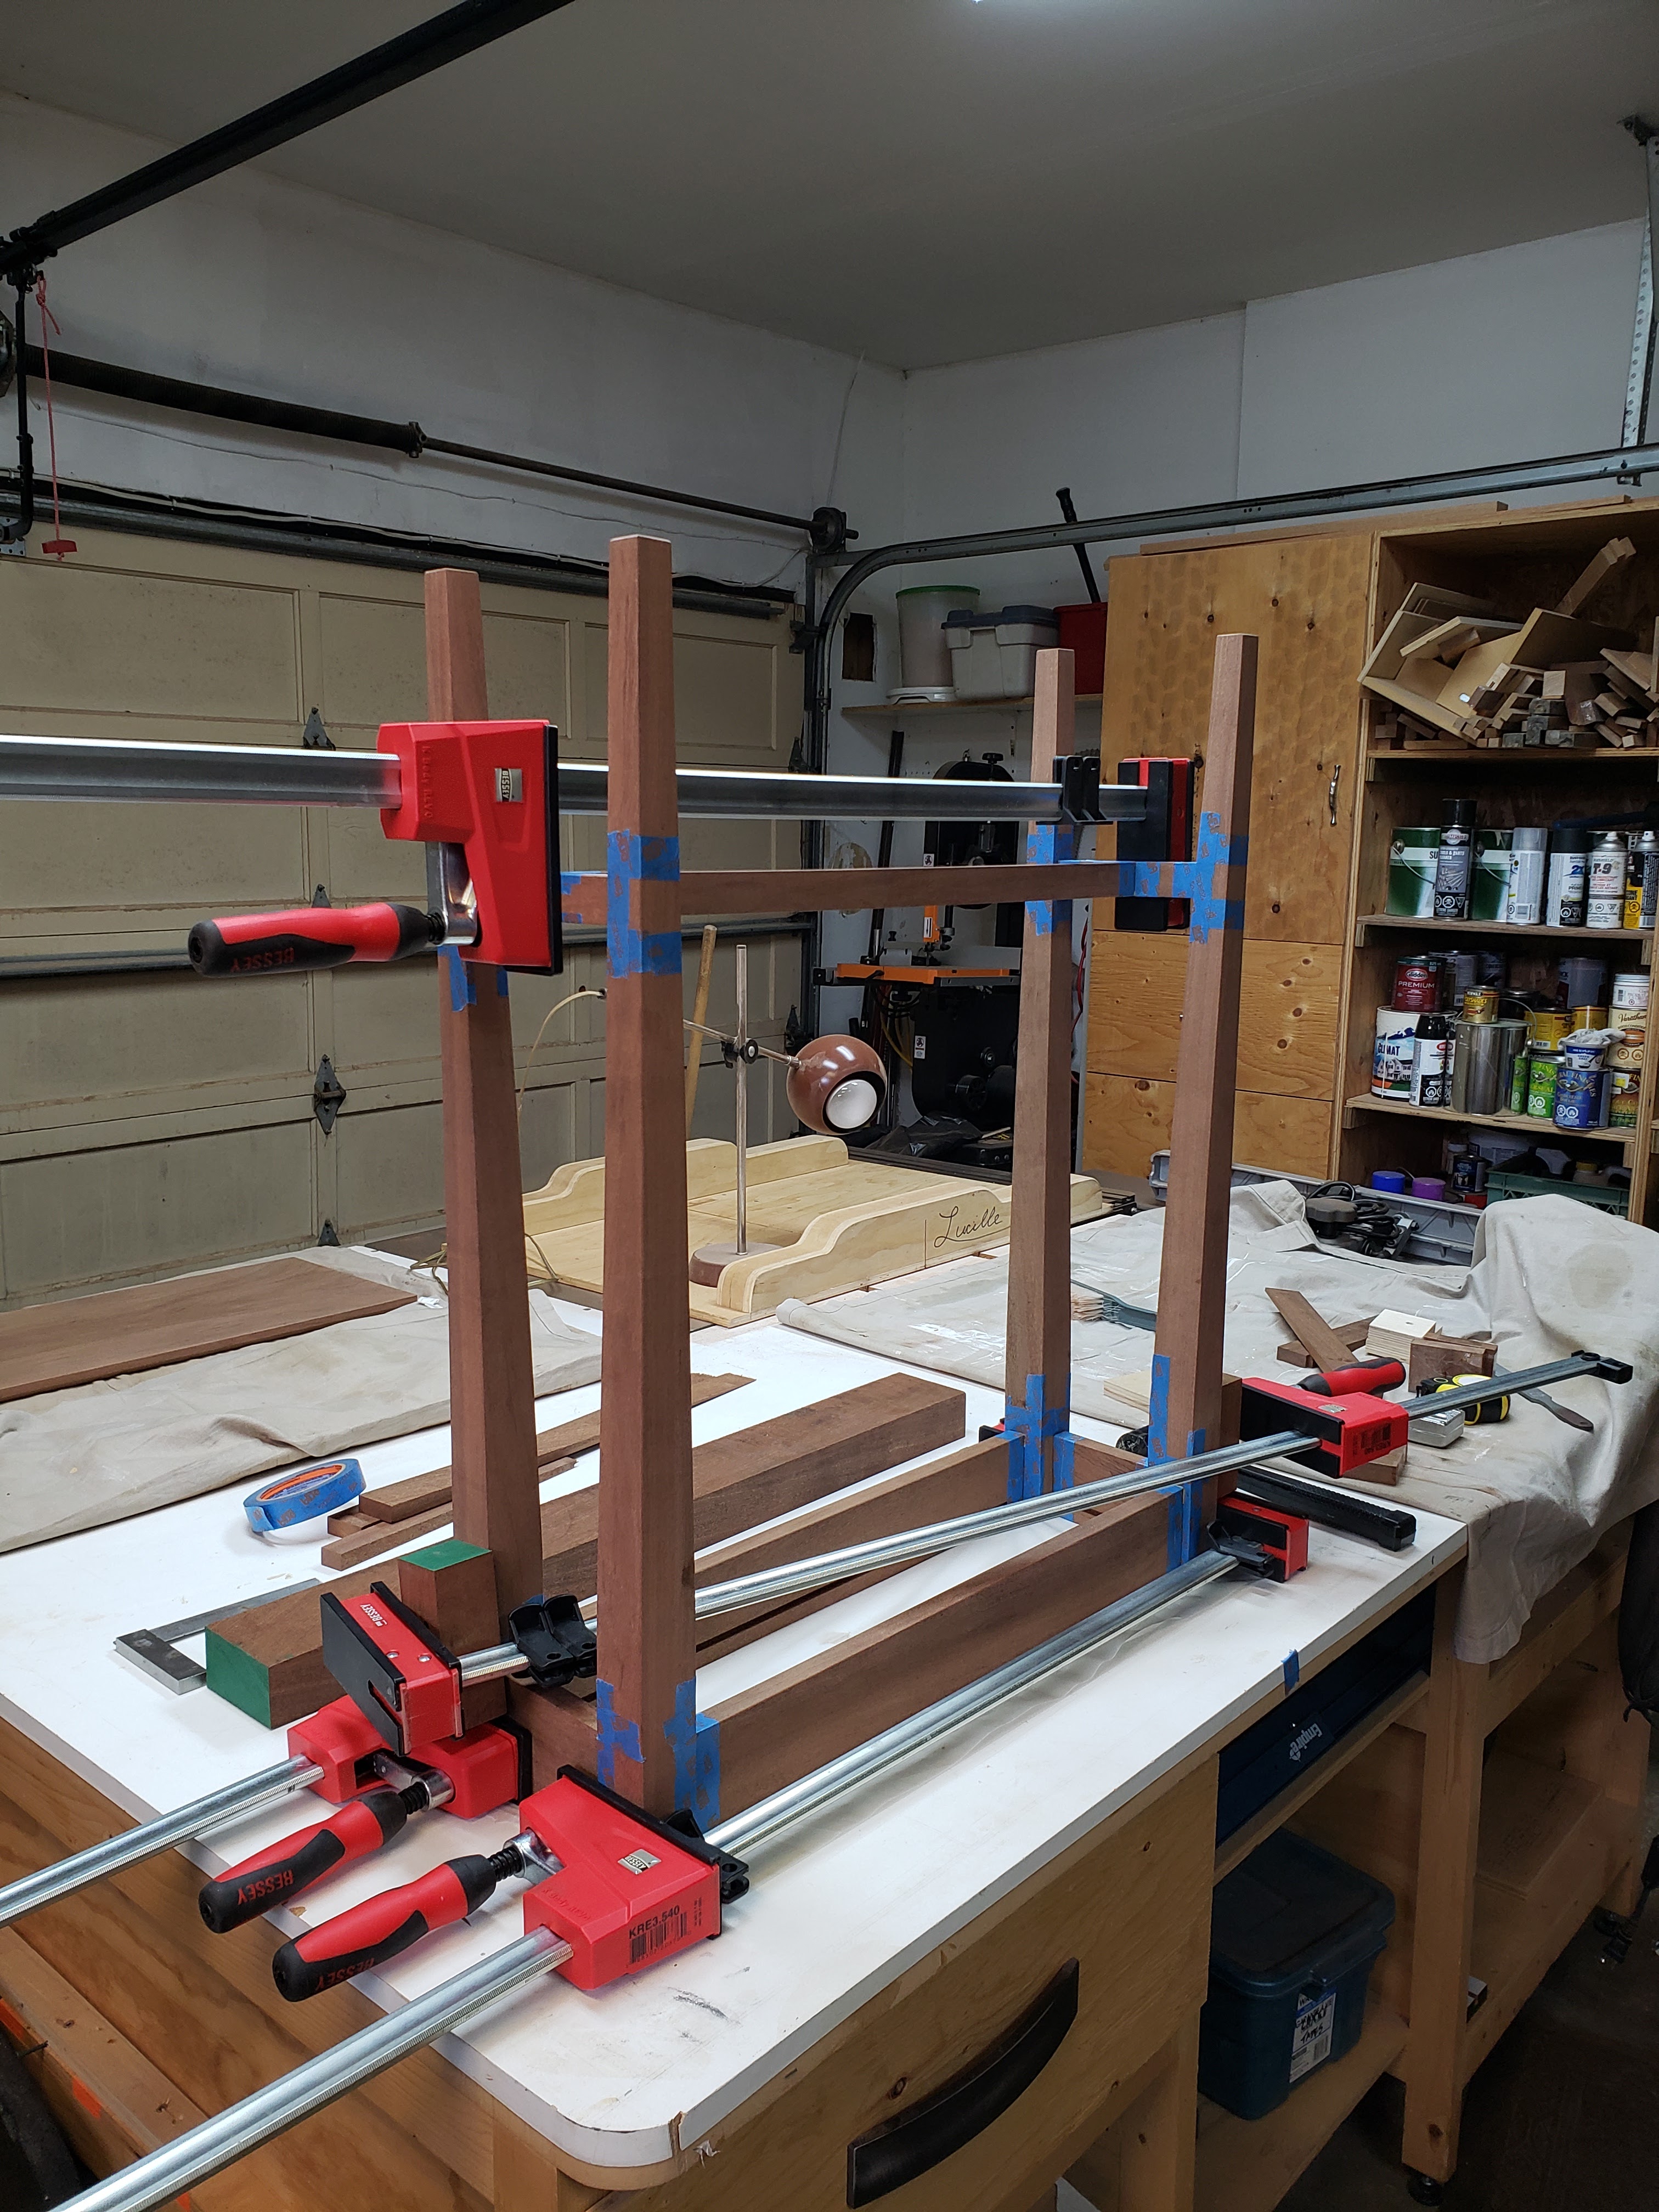
The first things I wanted to focus on were the legs and aprons. I wanted to try sliding dovetails for the joinery, so it made sense to make these pieces at the same time. And after a lot of very careful and finicky setup and lots and lots of practice at the router table:


I had perfectly snug-fitting sliding dovetails:


I'd just like to take a moment to say HOLY CRAP, sapele is the nicest wood to work with! It's dense and every so slightly soft - almost like milling up a giant bar of chocolate. It even smells nice.

The next thing I needed to do was taper the legs, and for this, I needed to build a jig. (Bet you didn't see that coming, eh?) I watched a few YouTube videos to get the idea of what I wanted to build, and then spent a gloriously happy couple of evenings and part of a weekend making what is now one of favorite jigs of all, a tapering jig for the tablesaw:


And yes, I named her Carly because I listened to a LOT of Carly Rae Jepsen while making it. It seemed only fitting. And the best part is that she works like a hot damn:


The next parts I had to make were the stretchers for the bottoms of the legs. I made a couple of minor mistakes here, but nothing outrageous. Really, the only problem was that I probably overthought it a little bit, and could have done the same thing in a much more simple fashion. But wevs! They turned out pretty good.

First I cut the stretchers to length and formed the tenons (using my micro-adjust screw advance tenoning jig - Judy - on the table saw.)


Then I drilled out the bulk of the waste for each mortise at the drill press and chiseled them square by hand.


Then it was just a matter of milling a few of the nicest pieces and gluing them into a nice panel for the top, and all the parts were done:


Time for sanding! But not before carefully putting my mark on the inside of the front apron:


Then came what SHOULD have been a relatively stress-free glue up (more on that later), two coats of Danish oil, and three coats of wipe-on polyurethane. 


I added some leveling feet in case the floor in that corner of the living room wasn't level, set it up, and carefully placed Amy's 50th birthday present on top.

Voila. The Horse Table.


Final thoughts...

Man, that could have gone better. The entirely milling and fabrication process was fantastic. All of the parts seemed to come out perfectly. The joints were snug without binding, the bookmatch on the table top was just was I was trying for, and even the stretchers worked out pretty well in the end.

The problem was the sanding and the glue up. See, I though sapele was a little.. tougher, being a hardwood and all. I carefully sanded up through the grits from 150 to 180 to 220, trying hard not to overdo it and still remove all the machine marks (of which there were in truth very very few). But it seems that, despite my caution, I still over-sanded. The sliding dovetails still slide, but now there are big gaps between the shoulders of the dovetails on the aprons and the sides of the legs. And because the stretchers were measured and made based on the original snug fit, they wound being ever so slightly too long, and pushed the bottoms of the legs out a hair's width too far, making the gaps on the aprons smaller at the top. 

All of which meant that when I went to glue it all together, I wound up over-clamping it, and making the entire thing askew. It's solid enough (thanks in no small part to the leveling feet) and it's entirely likely that no one would ever notice the tiny gaps or the twist in the frame, but I know it's there, and it really does bug me.

But Amy loves it, and the horse looks great on it, so that's the main thing. All I can do is just keep learning, I suppose.


Wednesday, April 24, 2019

A total frame job

Anybody says anything about how long it's been since I posted here, and I'll shut it down for good.

So, I might have mentioned this before, but my old man's a hell of a photographer. (Check it out: http://photographybywm.com/index.html No, seriously, check it out. I'll wait.) The last time I went up to visit, he was putting on a bit of a show to celebrate the release of a calendar he produced that focuses on the inimitable women in his little town. I helped him out with a couple of minor things, and in return, he gave me a photograph. An amazing one.

Well, I couldn't just tack it up on the wall, and I was in need of a little shop time after spending way too much time at my desk, so I took a day off and hied myself out to the garage one fine spring Friday.

It went something like this...

First, get big stick:


(In this case, the stick was western red cedar - a little piece left over from making the closet doors for my neighbours.)

Next, make stick flat:


Realize how long it's been since you did any basic saw maintenance and spend a gloriously happy 30 minutes making everything clean and shiny and not squeaky:


Turn stick into smaller sticks:


 Choices, choices:


When it doubt, go BIG:


I swear I JUST cleaned that:


That's a good start to a profile:


Profile's done, gotta cut the rabbet:


Sandy Sanding McSanderson


Gotta build at least one jig:


Splines! (And four coats or so of finish.)


Hopefully a frame worthy of the picture it was made to hold (and hanging in the front hall):


 Thanks Dad! We love it!


Sunday, December 17, 2017

Shop project: Drill press table

I swear I've had the pieces for this thing sitting around the shop for at least six months, it not more. The piece of MDF I wanted to use for the table has been around so long that all of my other scraps of 1/2" MDF hanging around the workshop are from a completely separate pieee that I bought for some other project.

Anyway, here's what I'm working with:


Some notes about that there particular set up:

  • The throat depth (between the stand and the chuck) is really not very deep at all. 
  • The handle at the back that raises and lowers the table sticks out far enough that it comes up beside the table. Which means that the new table has to sit forward far enough for the handle to clear the back edge. 
  • That table is tiny. And impossible to clamp anything to.
  • With so little room at the back, I need something reversible so I can set it up in FRONT of the chuck. 
  • I need an adjustable fence and stop block - or else what's the point of having a drill press table, really?
After a lot of mid-process design changes (what else is new?) and a few false starts, here's what I got!


The fence can be set up either behind the chuck, or in front of it if the desired hole placement is more than a couple inches from the edge. Which is good, because after setting the table far enough forward to clear the stupid handle, there's not a lot of room left...


(The black dot in front of the two screw heads is where the drill bit hits... when the table is actually centered, anyway.)

So much more clamping space, adjustable integrated stop block, and constructed almost entirely out of bits I had lying around the shop (for the past forever)!

Anyway, it feels great to get that finally off my plate., and the pieces for it off the bench. So I can store the parts of the next project there. Oops.

Sunday, February 5, 2017

When things don't work out

I had a really good project planned for January: I was finally going to finish the Shaker table I started way back in ... holy crap, 2014??? Um. Wow.

Anyway, that thing has been sitting in my closet ever since I brought it home from that class, waiting for me to get around to finishing it. I knew that I'd made a few mistakes during the build that would need fixing, but I figured that I'd learned enough since then that I could make a go of it.

Well, not so much. Turns out that the mistakes, while individually rather minor, added up to a real headache. You can see a fair number of them just in this shot of the front:


The main issues were:

  • I'd left the top sitting too long in the corner of the closet, and it had developed a rather nasty cup. I'd have to remake it from scratch - but I didn't have enough alder left, so I would have had to use a different material.
  • I had been a little bit off when I drilled the dowels to hold the top spacer (above the drawer), and as a result, it was twisted and slightly proud of the front. Flattening it woiuld have required a lot of sanding and chisel work, and I would never have gotten it quite right.
  • The entire carcass was ever so slightly out of square, meaning that the drawer would have to be "fudged" to suit the carcass.
  • I had messed up the drawer bottom the first time I made it, and had to drill a hole in it to pry it out of the drawer again. Meaning I would also have had to remake it.
  • On closer inspection, my dovetails were TERRIBLE. Front and back. 

The more I looked at it, the more I saw that just wasn't... good enough. I would have had to remake about half of the components, and spend even more time fixing the problems on the parts I would be keeping. 

In the end, I chopped it all up for firewood. Which really, really, really hurt, but was strangely cathartic at the same time.

With the table now out of the running, I needed a new project for this month. Unfortunately, the weather (and therefore the shop) was really cold this month, so I didn't want to do anything that would require special finishing - or even any more glueing than necessary. So I turned my attention to a pair of shop projects that I'd been meaning to do for a while.

I'd made little shop cabinet a while ago to store my table saw blades and really liked the way it turned out. the only downside was that, because it was designed specifically for 10" table saw blades, it wouldn't hold the 12" blades for the miter saw. I decided to modify the original design (which I should mention wasn't mine - I got it from Jay Bates) and make a cabinet that would hold not only the 12" miter saw blades, but also the 7 1/4" blades for the circular saw. 

Having already made one of these, it was a pretty straightforward build, with the sole exception of accidentally putting the bandsaw blade in backwards while cutting the profile for the sides. Works a lot better when the teeth are actually cutting!

In progress (you can see the original cabinet on the wall behind it):


Finished!


I should also mention that the reason I picked these projects is that I really wanted to get started actually USING the French cleat storage system we installed on the back wall of the shop.

That only took a couple of evenings out in the shop and was so much fun to build that I decided to follow it up immediately with another, similar project, and figure out a way to deal with the absolute chaos that was my sandpaper drawer:


To be fair, I did have a better system of organizing it than that depicts, but it wasn't exactly convenient to use, which meant that, well, I didn't use it. So I pulled out all the stuff I wanted to have handy while working at the bench:


Then I drew up some plans and started\making dust:


Finished!


As you can see, there's still lots of space left on the cleats:


Going to have to come up with some more storage plans - and decide what we're going to keep up there!