Tuesday, September 23, 2014

Woodworking Project: Bookcases

So....

Yeah. Been a while, eh?

Sorry.

Anyway, let's get past this unpleasant remembrance of things that might have been and get on to an actual, real-live post! That isn't about renovations!

No, seriously, things have stalled somewhat on the renovation front. Well, sort of. We've been spending a lot of time trying to turn the garage into a woodworking shop, but not a lot of effort on fixing up the rest of the house. Part of that has to do with a certain inability to decide which project we want to tackle next (I kind of want to do the upstairs bathroom but not really and the War Department kind of wants to do the family room but not really), and part of it has to do with the fact that I really want to get busy on some woodworking stuff. Oh, and the few renovations we've done lately have in reality been done by professionals, not us. Our new sunroom doors look AMAZING, but we can't really claim them as a great success because we did almost nothing except pay for them. Well, okay, the War Department did a wonderful job touching up the paint once the installers were done, I have to give her credit for that.

Anyway (before I ramble off on a tangent for the entire post), I will have some pictures and updates on both the shop and some shop projects, but I actually managed to finish something a while back and thought I'd like to share.

A couple years ago, I got a home renovation magazine as a gift or something (or maybe I gave it to the War Department as a gift and then appropriated it back, who can remember? crazy times!) that had plans for a set of bookshelves in it. Well, one bookcase, but according to the article, if you were buying enough plywood to do one, you might as well do two because of LIES. I really liked the look of the bookcases and felt like the project was right in my wheelhouse in terms of difficulty, and kept the magazine in the hopes that I would be able to actually make them one day.

So Mister Awesome (husband of the Maker of Pies, for those of you keeping track of my list of aliases and characters) was cleaning out his own workshop a while ago and gave us a sheet of 3/4" oak veneer plywood and a few longish pieces of dimensioned red oak. I immediately thought the oak plywood would be perfect for the bookcases (even though I'm not a HUGE fan of oak furniture) and seeing as it was probably going to be the most expensive of the required materials, figured it was time to get the rest of the stuff and get started. Besides, I had already ripped down the oak plywood into the right size pieces (okay, so I had to do that to get it out of the way in the workshop - at some point, I'm going to have to come up with a better wood storage solution or just not make anything that requires more than a half-sheet of plywood).

I pulled out the plans and the article and made a list of the remaining material I would need. Rather than buying the rough lumber and dimensioning it myself (which would have been very difficult to do, seeing as I do not have access to a jointer - yet), I figured I could buy acceptable oak pieces from my local Home Despot.

Well, yeah, as it turns out I could. And, as it further turns out, I DID, but man - that shit is pricey. All told, it cost $300 to get the material I needed - not including the oak plywood and the pieces I already had. I also had to settle on getting sanded pine plywood for the sides and back instead of more oak veneer because I really didn't want to spend a lot more money on top of that!

(For reference, I figure I could have bought rough lumber, dimensioned it myself AND gotten the oak plywood instead for about $180 all in. Plus whatever the 3/4" oak ply would have cost, which I shudder to think about. So yeah. That jointer would just about pay for itself if I made another forty sets of these, eh?)

So anyway, my final materials list looked something like this:
  • 1 sheet of 8' x 4' x 3/4" oak veneer plywood for the shelves and tops.
  • 1 sheet of 8' x 4' x 1/2" sanded pine plywood for the sides.
  • 2 sheets of 8' x 4' x 1/4" sanded pine plywood for the backs.
  • several miles of 3/4" red oak stock of varying lengths and widths. 
I was pretty close on my calculations of how much oak stock I needed, and I have quite a bit of the sanded pine plywood left to use for other projects (the leftover pieces are all a good size so I'm sure I'll find something to make with them), but I sort of knew that ahead of time, so whatevs (as the kids say). 

I hauled down the pieces of oak plywood from on top of the shop cupboards, ripped them all to final width, and then ripped down the side pieces from the 1/2" pine. I assembled the sides and shelves (according to the directions in the article, so I can't take a lot of credit for the process), and then attached the back, checking to make sure everything was square.

And then I sort of had a bookcase. Well, a bog-standard, somewhat boring one, with plywood cross-sections all over the place:


Now, if I was TRYING to make a bookcase look like I bought it at Wally World for $20, then I could have stopped there, but it would have been a waste of time, no?

What I needed to do was add some detail and visual interest. Fortunately, I had several hundred dollars worth of red oak stock ready and waiting to do just that.

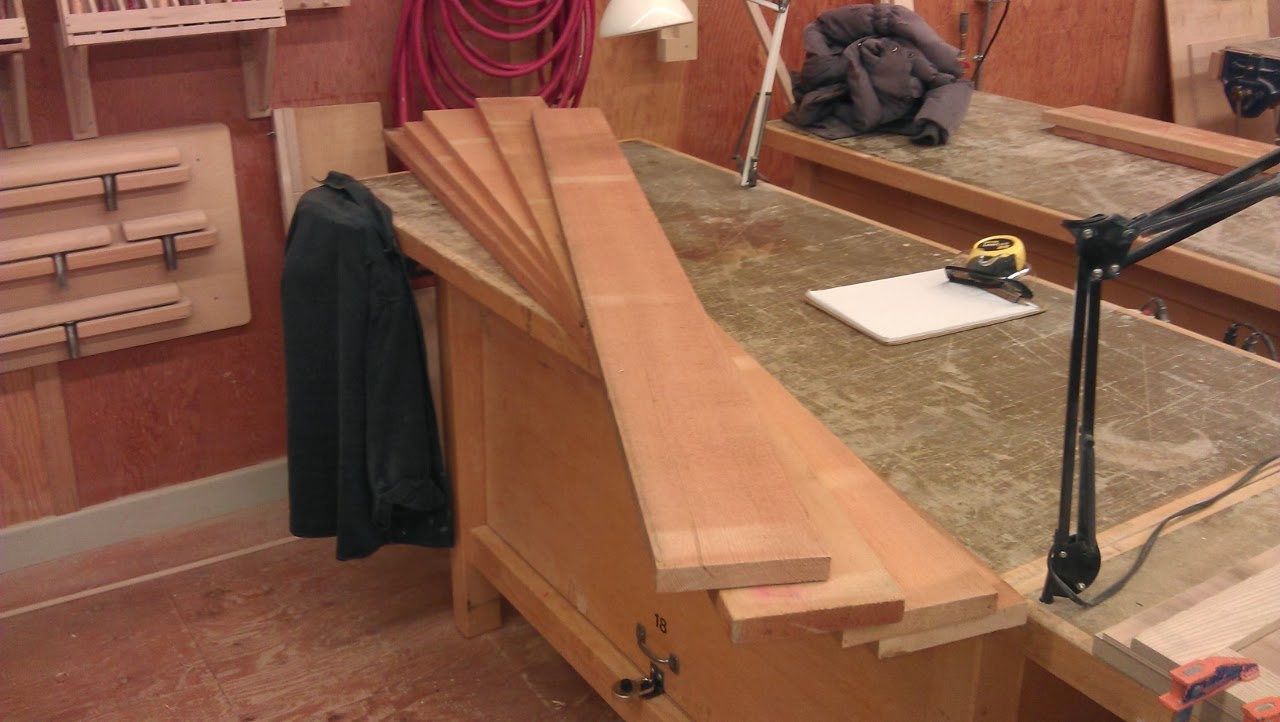
The first parts of trim I had to make were some cross rails with gentle arches in them for the top and bottom on each of the sides, and for the fronts. Marking out the arches was fairly easy: for the longer pieces for the fronts, I used a metal ruler between two blocks to create an arc, and then traced it onto the wood. For the smaller pieces, I used the lid to a yoghurt container (it might have been margarine, I'm sorry, I didn't keep track) that seemed about the right size.

Cutting them out on the other hand.. well, in addition to not having a jointer, I also don't have a bandsaw. Which means that the only tool I have capable of cutting 3/4" oak in a circular fashion is a jigsaw. And it's not the world's best jigsaw and I'm not the world's best jigsawer. The instructions in the article said that I should use the offcut piece to sand out my saw marks, but I was worried about how much sanding that would be. Especially given the size of the saw marks I was likely to leave, what with my crappy jigsaw (technically, it's Amy's, but I bought it for her so I'm taking the blame for how shitty it is).

So then I thought back to when I worked in the sign shop, and how we used to make sure that every sign in a lot of 300 (or 3,000) was the same size. We'd cut all the signs out of the appropriate material, but just a hair oversized. Then we'd use a template made of plexiglass and a flush-trimming router bit to trim them all down to the exact same size. (I spent four straight days in the router room once, doing brass signs for a hotel in Chicago. It was not the best four days of my life. Worst part about cutting brass was that it made my smokes taste weird. Dunno why. Anyway.)

Well, I had a router, and with a bit of finagling, managed to get it mounted underneath our router table (not the best or safest set-up, to be honest, but it worked out okay). I didn't have any plexiglass, but I did have some spare 1/2" plywood, and managed to make a couple of templates out of that using the jigsaw and the belt sander. It's worth mentioning that I messed up BOTH of the first versions of my templates, and that was with the plywood, which was infinitely easier to work with in terms of cutting and sanding.

Anyway, here are the smaller pieces ready to rough-cut with the jigsaw:


And here's what it looks like mounted to the template, ready to go through the router:


And here's what the eight finished pieces look like:


Exact same process for the four larger ones:


Then I had to cut some reliefs into the sides so they wouldn't extend past the bottom of the arches. Technically, I had to cut these twice, but who's counting?


So then it was really just a matter of slowly and methodically attaching trim to the sides, and then the fronts:


The combination of oak trim and pine boards gives it kind of a neat two-tone effect which, in all honesty, wasn't ENTIRELY unplanned:


And here's both carcasses, all trimmed up:


Looking pretty spiff!

The next thing to tackle was the tops. The plans called for oak plywood with a solid wood banding around the edge to conceal the plywood layers. The problem I had was that the remaining pieces of plywood I had wasn't wide enough. In my haste to store it, I had cut everything down to 9" (the depth of the shelves) and failed to keep the necessary pieces at 10 1/2". 

My only solution was to ditch the prescribed banding and create my own edging using the last few bits of oak stock I had. Fortunately, I DO have a planer, and I was able to pare down the stock to match the thickness of the plywood. Then I mitred the corners to fit and glued the banding to the last pieces of plywood, making a good sized top:


To conceal the seam between the top and the lower portion, I made a square piece of beading and glued it in place:


And that was it! All assembled and ready for finishing!


Which, of course, is when the nightmare began.

The sanding. Oh, my word, the sanding. So much freaking sanding, I can't even tell you.

I had (sort of) sanded the shelves, back and sides before I assembled them, and I took the backs off again to sand them one last time and finish them properly, but the sheer number of angles and corners on these things was brutal. I also had to fill the nail holes left from attaching the trim. and a few gaps left from knots and whatnot.

I was also introduced to one of the peculiarities of working with oak (and some other hardwoods, but oak in particular) which is that it tends to have rather large pores. This makes it hard to attain a truly smooth surface with some pieces, especially if the grain isn't as tight as it could be and depending on its direction within a piece of stock. While this is what makes that distinctive, bold pattern on your much-prized oak flooring, it makes it a nightmare to sand - especially by hand. And of course, the sanding HAD to be by hand lest I inadvertently sand off the top veneer of plywood with the random orbital - which actually happened once, forcing me to use the uglier side of the piece as one of the tops.

This issue was further compounded when I elected to use a Danish oil finish. See, the oil would soak into the pores during application, but then promptly seep out again while it was curing. Which meant that after every application, I had to rub down the entire bookcase with steel wool. It took four applications before the oil stopped coming out of the pores - so chalk up another $50 or so for the ENTIRE CAN of Danish oil I used. (This is probably why some woodworking sites don't recommend actually using Danish oil as a finish for oak furniture. Would have helped if I had read that before I started, but at least I learned something.)

I finally "finished" (har) and left them in the garage for a week or so to off-gas, and then brought them into the living room downstairs where they sat for another week or two until I managed to clear out the existing shelves and make some room in my office (and rehang a picture or two). Then I had Mr.-Not-Those-Clarks-The-Other-Clarkes help me take them upstairs and position them in my office.


So... honestly, I'm not crazy about the color. It's not great with the yellow walls and maple flooring. (Here's another picture without the flash so you can see what I mean - sorry about the blurry.)


But they're done, and once I filled them up with books, they looked just great:


Quite a bit of empty space on them, though. Oh no! I need more books! Whatever will I do???

Tuesday, April 22, 2014

Woodworking Level Two - redux

I've been reluctant to post anything from my third go at the Woodworking course for a couple of reasons, but mostly because I didn't actually finish the project. As it turns out, I really shouldn't have felt badly about it at all.

But before I get into that, some updates!

I couldn't take the Woodworking Level 3 course because, unfortunately, it only runs on Saturdays and I have far too many responsiblities at home on the weekends to be gone all day for four Saturdays in a row. Instead, I signed up for Woodworking Level 2 again with the same instructor and a promise that I would get to work on a different project instead of building another scotch cabinet. (Much to the dismay of certain friends, who desperately covet the one I already built - including the contents!) It turns out that one of the people who was in the first two courses with me had decided to do the same thing, and so I had a familiar face or two when I got back into the shop the first week of March.

This time around I would be tackling a Shaker-style table, made from alder. Traditionally, these tables are made from cherry or maple, but alder is a lot cheaper, and quite a bit softer - read, more forgiving. Sadly, I forgot to take a picture of my raw lumber, which is a shame because the entire table came from a single board (which is one of the coolest things about this hobby, I think).

Anyway, I was so engrossed in getting started and cutting and shaping the wood that I neglected to take any pictures at all until the second night. I had already cut the legs down to their square shape (they would take on the distinctive Shaker taper later), and the next step was to cut the mortises in the tops, using one of the funkiest jigs I had ever encountered:


It did a pretty good job, but like EVERYTHING I tried during this particular build, I need a LOT more practice at it.


It was during this part that I actually began to wonder about the complexity of the project. It seemed straightforward at first blush, but each of the legs needed to have the mortises cut in a slightly different way - needed a lot of concentration and triple-checking. Much, much more so than either of the first two projects.

Once the mortises were cut, I could form the tenons on the aprons; this was pretty much the only easy part, and that was because it was the same procedure as making the tenons for the rails in the last project.


Then I had to cut the pieces to go above and below the drawer on the front of the table and mark and drill for the dowel pins. (I messed this up very slightly, and I think it shows in the final product, sadly.) Once I had cut the taper on the legs (another high-concentration-required task!), I could start the first of the glue-ups. It's starting to look like a table! Or, like it might be a table some day.


I think that was five classes in at that point? Out of the nine alloted... Yeah, I was running short of time.

Anyway, I then moved on to doing the drawer. Actually, I had to spend almost and entire class making these, the runners for the drawer to ride on:


THEN I could start cutting and sizing the drawer front, sides, and back. My instructor really wanted me to try a dovetail jig he had found in a woodworking magazine, and I'm always up for being a guinea pig, er, up for an experiment. This is what that jig looks like in action:


It worked okay, but I cut a little too close to my lines (a common and repeated theme, I'm sorry to say) and it left my pins and tails a shade on the loose side. The rest of the dovetails were formed using a palm router and the old stand-by, a hammer and chisel.


And then I dry fit the drawer components and got a look at my first ever set of dovetails:


They're... okay. As I mentioned, they're a little loose, and I suppose for my first attempt, I should be happy. But more than anything, I just want to take another stab at them. I think dovetails are some of the prettiest details you can have in a woodworking project and I really, really, really want to get better at them.

And that's kind of where I ran out of time. I was frantically trying to get the bottom of the drawer cut down on the table saw at 10:00 on the last night of the class and forgot to put in a zero-clearance throat place and wowed out a big jeezley chunk of it and decided that I should probably just accept defeat and finish it at home, on my own time. Before I lost a body part in my haste or something.

Needless to say, I was disappointed that I couldn't finish the table, but as my instructor told me - AFTER THE END OF THE COURSE - that particular project is one of the ones that the Fine Woodworking class works on in their course. That lasts an entire semester. Three days a week. So yeah - not surprising I didn't get it done!

Fortunately, the generosity of certain Top Brass units, and a recent windfall in the form of getting a bonus from work, has allowed me to buy certain accessories to outfit the workshop a little more, and should help me finish the table at home.

Oh, and when I was looking for example of Shaker tables, I found the one on this page: http://www.owdman.co.uk/

Looks pretty similar, eh? Given what he's asking for that, I wonder if I should start taking offers for mine... ;o)

Monday, January 6, 2014

Woodworking Level Two

As mentioned in the last post, I really enjoyed the first woodworking course I took last fall. So much so, in fact, that I immediately signed up for the next one, despite the facts that my 3P allowance was more than used up on the first course and the second course started just over a week after the first one ended. (And didn't finish until less than a week before Christmas!)

The second course, creatively titled Woodworking Level Two, promised to not only have us learn new and more technical procedures, but also to supply us with something that was NOT a blanket box. So.. different?

Let me also take this opportunity to apologize for the poor image quality of the images in this post. I couldn't exactly haul my nice camera into the shop every week, so I had to take all of these with my camera phone. To make up for the crappy images, I've made sure to include a lot of them. So yay, I guess.

Anyway, much like the first course, I had to go out and purchase the raw lumber. One major difference, though: for this project we'd be using fir instead of pine:


Make that TWO major differences if you count the price. Let's just say I'm much more reluctant to make kindling out of the leftover scrap.

The project for this course was to build an arts-and-crafts style wall cabinet. Out of the nine people taking the course, eight of us had just finished the Woodworking Level One course together and it was the same instructor, so it was really easy to just dive right back in.

It also seemed to progress much faster (fewer people waiting in line for the table saw, maybe?), and by the end of the first class, I had the sides, top, bottom, and middle shelf all planed, jointed, and cut to size:


The next step was to cut the dadoes and add the details on the uprights, and chamfer the appropriate edges on all of the front-facing sides. This is one of the details that defines the arts-and-crafts style, apparently (but what do I know? I'm still learning....):


Then we drilled the holes for the shelf supports and assembled the main carcass:


It was about here that I started to wonder why we needed all 9 classes for this course. After all, it had taken us the better part of four courses to just dry-fit the carcass in the last class and I had already finished the glue-up on the cabinet by the start of the third night!

At which point, of course, we started the hard parts.

First up was making the stiles (long uprights) and rails (shorter crosspieces) for the doors:


Cutting down the rails to form the stub tenons:


And fitting the pieces together into doors (note the extra rails for practice and mistakes):


Then cut the panels (out of plywood with a fir veneer - they're not solid wood as that would have been rather expensive and time-consuming - and a more advanced technique than we wanted to get into for this class) and glue up the doors:


Then we got to learn how to resaw lumber to make thinner boards without wasting too much material in the planer (I'll need to practice this technique - I got it done okay, but my pieces turned out slightly wonky), and made simple drawers:


It's a good thing I made extra material, because I broke two sides while trying to glue up my drawers, and had to remake them. Pro tip - the bottom of the drawer doesn't have to be quite THAT snug...

Fortunately, I recovered from the mistake, and managed to get the drawers assembled, and then sanded them down to fit into the appropriate receptacles:


Somehow, after all that, I had exactly one class left to do the hinges, just like last time. Amazing how time flies when you're having fun, eh?  I started by carefully and gradually shaving down and "bluffing" the doors until they fit into the opening with the same reveal all the way around:


Then I marked out the hinge placement and mortised the sides of the doors:


And then mounted the hinges to the sides of the cabinet. Fortunately, I had bought high-quality hinges, and thus didn't have to mortise the cabinet sides as well - I could even adjust the spancing afterwards:


And that was it! Last class of the course and I had a completed cabinet:


Well, almost. I still had to actually finish it. So I took it home and disassembled it to prepare it for staining:


I'll spare you the boring ass details of the sanding, staining, and applying shellac and instead just show you how it looks on the wall of our kitchen:


So there you have it!  A...


What?


What's that?


You want to know what we plan to keep inside it?


Well....


All right. But keep in mind that it's not very deep.


And not that big, either, once the shelves are in.


But we did find SOMETHING that fit.


Just right.


Next course start March 3, by the way. I'm already signed up.


Thursday, January 2, 2014

Woodworking Level One

So my company has this thing called the 3P Program (it stands for Personal Progression Program, which should make it the 2P Program, but whatevs, right?) where employees can choose some sort of personal improvement or goal, and the company will give them some money towards achieving that goal. Weight loss and quitting smoking are popular choices, but we've had people use the money to improve their home brewing set-up, learn karate, take guitar lessons, and even adopt a kid. Really. No, not all at once - different people, dummy.

Anyway, last time I applied for the 3P grant, I used it to get our bikes fixed up so we could spend more time biking around the peninsula (mostly heading to or from the pub, of course). I'm already paying my own way at the gym and I haven't smoked in years now, so I was somewhat at a loss for what to apply for this year. I've been toying with the idea of taking some continuing education courses for a while, but I wasn't really sure what I wanted to take.

And then I noticed that they had some interesting courses for woodworking. The War Department had actually taken a couple of woodworking courses a few years back (the results of which are still scattered about the house in various stages of completion) and really enjoyed it, and it sounded like something I would not only enjoy, but probably find useful in our ongoing renovation efforts as well. You know, to help reduce the chances of something really serious showing up in the Injury Report.

So I signed up for Woodworking Level One, which started at the beginning of October. The first thing I had to do was go buy the lumber:


(Well, technically, the first thing I had to do was figure out the difference between lineal feet and board feet, but whatevs.)

(I'll stop saying whatevs now. Even I hate myself when I say it.)

Two three-hour classes in and I had managed to make not only a whole lot of sawdust, but the three panels that would form the front, back, and sides:


The pieces on the left there would eventually become the lid, but I didn't get to that because there was a bit of a line-up at the planer. (Heh, out of the twelve people in the course, eight of them worked in IT. Go figure.)

Some more planing and sanding got me a bottom panel as well, and then I cut the dadoes and rabbits to fit the whole carcass together:


That's not actually assembled - it's just a dry fit to make sure the pieces went together properly. To actually assemble it, I used a judicious application of glue - and lots of clamps!


There followed a bunch of classes that involved cutting and fitting the trim (and the only semi-serious mistake that I made throughout the construction and won't describe here), and then assembling the lid:


It took almost the entire last class just to fit the hinges as they required lots of router work and delicate mortises. I used a piece of scrap wood here to prop the lid open to show the hinges and construction - it's not part of the actual box:


Of course, as I was moving the box off the workbench to make room to mortise the hinges out, I gave the bottom of it a great big jeezley whack on the bench vise, leaving a big dent right in the bottom trim near the front left corner. Sigh.

I'm not a huge fan of the shiny brass hinges (they were the only ones I could find at Home Despot on short notice), but I really like the handles. The instructor was also impressed - I was the only one in the class to finish both the hinges and the handles - and said that IF he actually gave out grades, I'd get an A+. (Curse you for not providing letter-based validation, adult continuing education!)

Anyway, it took a fair bit more sanding and filling and whatnot, but I rubbed it down with several coats of tung oil and then waxed and buffed it to a dull shine:


So now I have to figure out what to actually DO with the final product. Maybe I'll make some smaller boxes to store in the bigger box. Or maybe I'll give it away to a deserving orphan or something. Maybe I'll keep one of the cats in it until they SHUT UP AND LET ME SLEEP IN FOR ONCE.

As far as the course itself went, I have to say that I was really impressed. I learned a lot more than I honestly thought I would, and picked up many hints and tricks that will help in the future - and not just with woodworking but with other renovation projects as well. So even though a three-hour course in the evening made for some very long days, I was still really looking forward to the next one... which started less than two weeks later.