Showing posts with label Odds n Sods. Show all posts

Sunday, October 22, 2017

Bushwhacking

Hello? Is this thing on? Hello?

Oh, hey there! How are ya? Been a while, eh? Yeah, I know, I know. This time, though, I swear, I really will start....

Well, we're here now, anyway, so let's get to it!

We've been telling each other for, oh, let's say five years now, that we REALLY need to do something about the blackberry canes in the backyard. But due to one reason or another (worried about disturbing the bunnies, laziness, too many wasps, or a combination of all three), we've been putting it off and putting it off.

Until our backyard starting looking, well, jungley, and it was starting to get ridiculous. So we geared up, invited the Not-Those-Clarks-The-Other-Clarkes over to join in the "fun", and waded right in.

Choose your weapon!


It was somewhat difficult to really get a decent shot that showed the true extent of the infestation, so here are some more-or-less "before and after" pairs showing roughly the same spots in the yard.

Before


After

Before

After


And my personal favorite...
Before

After

All in all, we cleared a metric shit-ton of blackberries, and really changed the entire look of the yard. This particular chore was long, long overdue. Of course, such a successful day did not come without cost...

The Injury Report

As it turned out, the machetes weren't the most effective tools in our aresenal. The best way to clear out the canes was to chop them off a foot or so above ground, and then get a firm grip on a few of them and just haul on them.

Well, I was deep in the jungle, doing exactly that. Unfortunately, somewhere in the mess of branches and blackberries that I was hauling on was a cane under tension. When the bunch I was hauling came free, the rogue blackberry came up and whapped me right in the eye. It felt just like that time I was pulling nails out of the flooring in the basement at the old house, and one of the nails came up and thumped me.

After the requisite swearing and squinting, the pain receded a fair bit, and I went back to work, thinking that I'd had a lucky escape - it would have been really nasty if a thorn had stabbed me, wouldn't it?!

We finished tidying up the piles of blackberry canes, figuring that we'd deal with actually getting them out of the back yard the following weekend and maybe even rent a chipper to make the job easier (which didn't happen, but it turned out that just cutting them up and taking them to the yard was easy enough). The Not-Those-Clarks-The-Other-Clarkes went off home to get cleaned up while I mowed the lawn, and then we all met back up for some well-deserved dinner....

Except my eye had REALLY started to hurt again. It was tearing up like mad, and I was getting sharp pains when I tried to focus or went into a brightly-lit room. Thinking that maybe the injury was worse than I had originally thought - or that I'd gotten something stuck in it, we sent our guests home (unfed, I'm sorry to say), and hied ourselves off to the clinic (which was closed, of course) and then to the emergency room.


(Nothing in that cupboard was for me, but I spent a good 30 minutes reading those signs and wondering what some of those things were for ...)

Turns out that the branch DID have a nice big thorn in it, and I'd done a tremendous job of puncturing my cornea. Yay me! It took a little over a week's worth of near-constant eye drops (four different kinds) and three trips to the eye doctor before it cleared up.

Pro tip: Even if they do make you look like a safety nerd, always wear your safety gogglers.


Thursday, October 22, 2015

Woodworking Project: the Phone Shelf

So "designing" the bi-fold doors in SketchUp was really just replicating something in the program that already existed in real life. For my next self-imposed SketchUp tutorial, I wanted to try actually designing something in the software first, and then use those plans to build the physical object.

Well, for some time, the War Department had been wanting a little shelf in the front hall on which we could store our phones. Ever since we ditched the land line and went full mobile, our hall table (never all that tidy at the best of times) had become overrun with phones and charging cords. Not only that, but every time we unplugged one of the phones, the charging cord would invariably slip off the edge of the table and have to be retrieved from the floor or slot beside the table via various contortions.

The idea was to design a simple shelf that we could hang on the wall and to which the charge cords could be attached (or removed) so they wouldn't keep falling off onto the floor. This would also let us use the tabletop for other, more important things like receipts, wallets, half-packs of gum, keys, an old crystal ashtray slightly overflowing with coins, mail that needed to go upstairs but never seemed to make it any farther, sunglasses, gloves, misplaced remotes, address books without any addresses, flashlights, dead batteries, live batteries, feathers found on walks through the neighbourhood, expired or used up gift cards, completed shopping lists, a pen and paper for messages leftover from when the land line lived there and we might have to actually take a message, some bent nails that I pulled out of my pockets when I came in from the shop and didn't want to take upstairs, memory sticks, DVDs borrowed from the neighbours that we kept forgetting to give back, tape measures, old sore throat lozenges, six or seven assorted rubber bands, and whatever else happened to qualify for the exalted position of life's hallway detritus.

I had some pretty good ideas (or so I thought) for the overall design for this thing, and dove into SketchUp to see if I could do it.

Let's just say that it was a real learning experience.

I very quickly realized that my original plan was... not really feasible. I hadn't really thought through the joints and seams and construction of the thing and one thing I can say about SketchUp is that it REALLY forces you to work through these little details.

But with a few false starts and a fair amount of rethinking, I finally wound up with this:


The charge cords are supposed to be fed through the bottom of the shelf so that they hang from the front edge where they can be easily grabbed and plugged into the phone - which in turn sits on the shelf face up, at a slight angle, where it can easily be checked whenever one happens to be going by. There's also a slot at the back where, theoretically, one could store a tablet while it was charging, though as neither of us actually HAS a tablet, it's just a little extra feature I wanted to try. Just in case.

With the design at least somewhat finalized, I used SketchUp to make an exploded diagram that indicated all of the required dimensions and clearly identified all of the separate pieces.


Armed with my fancy little exploded diagram, and a few nice pieces of scrap alder, I headed into the shop to start building.

Which is where I learned my second very important lesson about designing stuff: thinking of something (and even laying it out in SketchUp) is not the same as actually building it. I had designed some ... er, interesting joints - especially for the lid - that proved to be exceptionally tricky to replicate in real life. I was also working with measurements that were a lot finer and more delicate than I had anticipated while designing the model. 

But I persevered, and after a few missteps (including an incorrect measurement visible in the exploded diagram above) and a couple of false starts, I managed to successfully build the phone shelf:


The back of the shelf is supposed to be mounted to the wall, and the shelf then rests on the back piece. The idea was to make it removable so we could get to the inside and remove the charge cords if necessary (to take them on a trip, for example), but easy to mount back on the wall as necessary.

Here's the back and the bottom:


Sadly, the back didn't QUITE work as intended (something of a design flaw), so we decided to just stain it, put some feet on the bottom (to keep the cords from getting pinched underneath it), and leave it sitting on the hall table.

And I have to say, it actually kind of works:


It's not my favorite project ever, but it does the job and I learned a LOT about design, SketchUp, and how unwilling I am to let my fingers get too close to a router bit.

Oh, and I got to build two separate jigs for this project, and making jigs makes for a very happy Don.


Thursday, January 2, 2014

Woodworking Level One

So my company has this thing called the 3P Program (it stands for Personal Progression Program, which should make it the 2P Program, but whatevs, right?) where employees can choose some sort of personal improvement or goal, and the company will give them some money towards achieving that goal. Weight loss and quitting smoking are popular choices, but we've had people use the money to improve their home brewing set-up, learn karate, take guitar lessons, and even adopt a kid. Really. No, not all at once - different people, dummy.

Anyway, last time I applied for the 3P grant, I used it to get our bikes fixed up so we could spend more time biking around the peninsula (mostly heading to or from the pub, of course). I'm already paying my own way at the gym and I haven't smoked in years now, so I was somewhat at a loss for what to apply for this year. I've been toying with the idea of taking some continuing education courses for a while, but I wasn't really sure what I wanted to take.

And then I noticed that they had some interesting courses for woodworking. The War Department had actually taken a couple of woodworking courses a few years back (the results of which are still scattered about the house in various stages of completion) and really enjoyed it, and it sounded like something I would not only enjoy, but probably find useful in our ongoing renovation efforts as well. You know, to help reduce the chances of something really serious showing up in the Injury Report.

So I signed up for Woodworking Level One, which started at the beginning of October. The first thing I had to do was go buy the lumber:


(Well, technically, the first thing I had to do was figure out the difference between lineal feet and board feet, but whatevs.)

(I'll stop saying whatevs now. Even I hate myself when I say it.)

Two three-hour classes in and I had managed to make not only a whole lot of sawdust, but the three panels that would form the front, back, and sides:


The pieces on the left there would eventually become the lid, but I didn't get to that because there was a bit of a line-up at the planer. (Heh, out of the twelve people in the course, eight of them worked in IT. Go figure.)

Some more planing and sanding got me a bottom panel as well, and then I cut the dadoes and rabbits to fit the whole carcass together:


That's not actually assembled - it's just a dry fit to make sure the pieces went together properly. To actually assemble it, I used a judicious application of glue - and lots of clamps!


There followed a bunch of classes that involved cutting and fitting the trim (and the only semi-serious mistake that I made throughout the construction and won't describe here), and then assembling the lid:


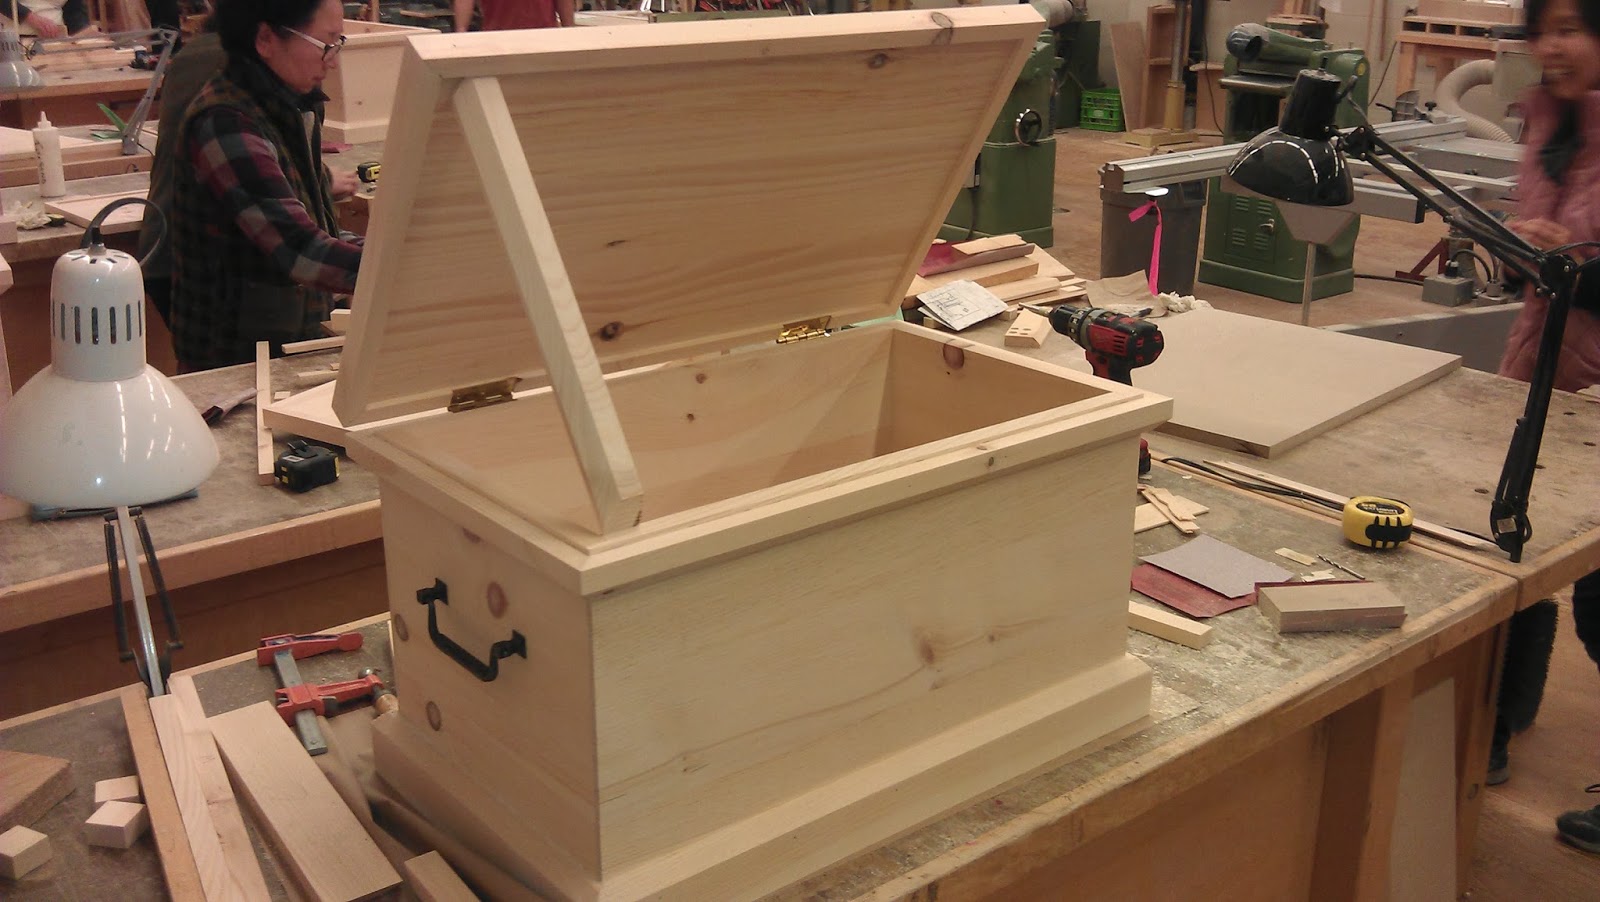
It took almost the entire last class just to fit the hinges as they required lots of router work and delicate mortises. I used a piece of scrap wood here to prop the lid open to show the hinges and construction - it's not part of the actual box:


Of course, as I was moving the box off the workbench to make room to mortise the hinges out, I gave the bottom of it a great big jeezley whack on the bench vise, leaving a big dent right in the bottom trim near the front left corner. Sigh.

I'm not a huge fan of the shiny brass hinges (they were the only ones I could find at Home Despot on short notice), but I really like the handles. The instructor was also impressed - I was the only one in the class to finish both the hinges and the handles - and said that IF he actually gave out grades, I'd get an A+. (Curse you for not providing letter-based validation, adult continuing education!)

Anyway, it took a fair bit more sanding and filling and whatnot, but I rubbed it down with several coats of tung oil and then waxed and buffed it to a dull shine:


So now I have to figure out what to actually DO with the final product. Maybe I'll make some smaller boxes to store in the bigger box. Or maybe I'll give it away to a deserving orphan or something. Maybe I'll keep one of the cats in it until they SHUT UP AND LET ME SLEEP IN FOR ONCE.

As far as the course itself went, I have to say that I was really impressed. I learned a lot more than I honestly thought I would, and picked up many hints and tricks that will help in the future - and not just with woodworking but with other renovation projects as well. So even though a three-hour course in the evening made for some very long days, I was still really looking forward to the next one... which started less than two weeks later.

Thursday, September 22, 2011

The Saga of the Bookcase

Fair warning: this really isn't a saga. I admit nothing and promise less. (But you should all be used to that by now...)

Anyway, as I've mentioned before, the War Department's office is also our guest room (as our friend from Toronto* found out over the Labor Day weekend). This means that in addition to her desk and files and whatnot, the War Department has to share the room with a rather large bed. There are also two large windows and a closet - meaning there is precious little floor space against the walls she can use to put a bookcase or even a chair. As a matter of fact, there aren't even that many walls on which to hang pictures or artwork.

The solution was to find a bookcase to hang on the wall beside the bed to give her a little extra storage and display space. The problem with the solution (oh, you knew this was coming) is that bookcases just simply don't come in the precise dimensions we wanted. Which meant that, if we wanted something that was nice and would fit where we wanted it to go, we would have to build it ourselves.

Fortunately, I actually have built bookcases (well, one) before, so once we had the overall size of the thing figured out, it was off to Home Despot to pick up the lumber.


Now, I COULD (and probably should) bore the crap out of you with all the little details about making the bookcase. In fact, maybe I will. After all, making it was something of an endurance test for me, so why shouldn't reading about it be just as much of an endurance test for you, hmm? Only without the distinct possibility of sawing off one of your fingertips on the table saw. Unless, you know, you were trying to stay awake.

Right, so, as always, the issues started with buying materials. In fact, there were several mistakes made when selecting the materials. First, I bought the wrong plywood. No seriously. I mean, I blame the War Department, at least partially, because she was with me and didn't notice that we were buying good-one-side plywood, rather than the good-two-sides that we actually needed. Not that it was THAT big a deal, really, it just meant more sanding, but what really compounded the mistake was buying twice as much as we actually needed. (Looks like I'll be building another bookcase at some point, I guess.)

Anyway, along with the plywood we bought some trim to finish off the face of the bookcase to hide the edges of the plywood. We bought the right stuff, at least... and too much of it. (So I guess the next bookcase will likely have the same trim? Yeah. That's it.) Again, I blame Amy - she knows I'm not so good at math.

Then we took all the materials home, put them in the garage, and left them there for a couple of weeks. You know, to acclimatize. Or something.

When I finally got off my ass long enough to get started, I drew a careful diagram of the pieces I'd need, realized we'd bought too much plywood, swore, and then set about marking out the pieces on the plywood. I made all my markings, set up the fence for the circular saw, double-checked the width of the saw guide, locked everything down, and cut the first piece (the largest piece) approximately 3/32 of an inch too short.

When I finished swearing, I double-checked to make sure the War Department hadn't heard me, and quickly checked all my other measurements to make sure that it would all still work. Fortunately, I had cut it too short - too long, and I would have had to start over with the back-up piece of plywood. So, good thing we had it, right? Right?

Anyway, the rest of the cuts went okay, although I had a devil of a time figuring out the placement of the shelves and had to measure everything about eight times before I got it right. You see, the design called for a 3-foot by 6-foot unit, 7 inches deep, with 9 little cubby holes. I really wanted everything to line up nicely, but because I had cut the first pieces too short, I had to recalculate the placement of the center shelves. (Heh, the best part is that I don't think Amy actually knows any of this yet. She thinks the shelf is 6" x 3", but it's actually closer to 71 5/8" by 35 7/8". Hee hee!)

Then I got to start putting it together:


Once the initial pieces were good and bonded, I could start adding trim:


And yes, the trim overlaps on the bottom of the bookcase so you can slide books off the shelves without having to lift them, It also helps to conceal the wood we attached to the wall to help hold the whole thing in place. I also added edge trim to cover up the faces of the interior shelves. Which, of course, was slightly bigger than the plywood and thus had to be sanded down.

Somehow I completely failed to take a picture of the sanding and painting process. Which is particularly weird considering how unbelievable tedious and lengthy the process was. I had to sand the whole thing with three grits of sandpaper, fill the holes, sand again, prime, sand the grain down again, fill the cracks and holes I missed the first time, sand again, paint, sand the grain down again, and then paint AGAIN. And then, of course, we had to figure out how to attach it to the wall.

But, and I say this with all due humility, I think it looks pretty damn good:


Yes, we probably overdid it with the brackets, but there will be people sleeping there some day. And not just friends from Toronto, damn it. People we actually like.**


*Hi Gillian!

** I kid. Gill's the absolute bomb, and the best house guest you could ask for. Seriously - I'll send her over. You'll like her. She's awesome.

Sunday, March 27, 2011

A little bit of catching up...

We're mired in that seemingly interminable process of painting, installing, filling, sanding, filling, sanding, painting, and painting the trim in my office, and none of it looks all that impressive. It also, as I may have intimated, takes FOREVER.

So I thought I'd use this post to catch up on a mixture of things that have been going on around the house and in the neighbourhood. Not really sure what I'll wind up including, but hey - you get what you pay for with this blog.

Let's get started, eh?


Timer switch


That little beauty is the awesomest invention ever. I know it just looks like a light switch with a clock in it, but check it out:


It glows! Hahahahahaha!

Uh... too excited? Yeah? Thought so...

Anyway, the point of that particular switch is that, here in the wilds of BC, the sun goes down awfully early in the day in the winter. This meant that the War Department was getting home from work in the dark, and trying to unlock the door in the already darkened doorway. We needed a way to make the outside lights come on before she got home - preferably a way that didn't involve leaving the damn things on all day, sucking up power.

Unfortunately, the outside lights are on a three-way switch (there's another switch for them inside the garage), and we really didn't want to start tearing out drywall and rewiring them for a timer or light sensor.

Fortunately, we found these on the inter-tubage, and what with the War Department's prowess as an electrician, we now have outside lights that come on automatically when the sun goes down - and yes, the switch calculates sundown for us, without the use of an exterior light sensor. It even compensated for Daylight Savings Time. Gotta be right up there in terms of the best 60 bucks we've spent on the place.

New Arrival
I had to transfer some money from one of my investment accounts to another, and some of it "accidentally" made its way into an entirely different account. One that promptly signed over the contents to Sears:


What's in the box, you ask?

One of these beauties:


No, you can't see the front yet. Not until it gets installed on Wednesday.

Finishing Up Old Chores AND This Week In Mayonnaise
Way back when, we fixed this monstrosity on the front wall of the living room. As I explained at the time, it was a piece of old extension cord spliced into an electrical wire that ran through sprinkler piping out through the wall, and underground to the lamp beside the driveway - the fake wrought-iron Canadian Tire special visible on the right side of this picture.

Anyway, we were out puttering around in the nice weather on Saturday (seriously - what the ever-lovin' Jebus is up with the weather this spring? It's almost April and we haven't even mowed our lawn yet! Sheesh!) and Amy asked if I thought I could just push the lamp over, and get it out of the way. Turns out it wasn't nearly strong enough to support the weight of the slab of concrete in which it was based, and the lamp snapped neatly in half. Which, I suppose, made it easier to carry into the garage where it will sit until our next trip to the recycling depot. Once that was out of the way, though, we took a closer look at the base:


Yeah - looks like the electrical was equally as crappy on both ends of that installation. It's not even outdoor wire - just regular old Romex. They just fed it right up through the form and poured the concrete over it. And then they set the lamp down into the concrete, essentially ensuring that the wire would ALWAYS be passing directly through whatever water had accumulated in the base.

Oh, and those little round marks around the outside of the footing? Coins. From the eighties. Oh, and I just KNOW you're wondering how (because "why?" would be unanswerable) the coins were attached to the concrete. Go ahead, ask me.


Mayonnaise, of course.

Finished!
Anyway, in the five days or so that it's taken me to get around to actually finishing this post... we finished the office! Whoo!


Of course, I can't actually use it as my office yet. See, we kinda need it as a spare bedroom and to store all the crap we've been storing in Amy's office.

Three guesses what the next project is, and the first two don't count....

An Anniversary
Before I go, I'm not sure how this affects what I'm sure are a number of various and varying pools and betting circles out there, but this was exactly a year ago today:


So there. Nyaaah!

Friday, October 15, 2010

Stay-cation: Days Five and Six

Sorry about the lack of update yesterday, everyone. It was just the realization that we're not going to get even close to finishing the bathroom this week was a little disheartening. Well, that and the fact that the tiles looked pretty much exactly the same after setting them in place as they did when I dry-fit them. I did manage to get them all down in thinset on Wednesday, but then of course had to wait 24 hours before I could grout them on Thursday.

As it turns out, we have to wait SEVENTY-TWO hours* after grouting the tiles before we can seal them. Seeing as how everything else we need to do in there (with the exception of the electrical, and the War Department can whip that off in twenty minutes or so) needs to have the sealing done first, and we can't seal until Sunday at the earliest.. yeah, we ain't getting it done this week. Maybe by next Sunday...

* (As recommended by the grout manufacturer. Some sites advocate waiting THIRTY DAYS before sealing slate tile. Needless to say, screw that noise.)

But not being able to finish the bathroom doesn't mean we haven't been busy! Aside from the bathroom, so far on this stay-cation we have managed to knock off some other projects.

  • For example, the War Department got her chainsaw working! Now, I know this doesn't sound like much, but when you consider that a) the chainsaw was made in 1976, b) she had to make no less than three separate trips to the parts store to get the right stuff for it, c) she had to remove and rebuild the entire carburetor, and d) I was absolutely no help whatsoever (the one thing she wanted my help with I couldn't do because of my great fat sausage fingers), it's pretty impressive. She spent almost the whole day on Tuesday working on it while I was cutting tiles, and finally got it running on Wednesday.


    Now she just needs to do the same thing for the weedeater, and we'll be golden.


  • She also cleaned and caulked the gutters and downspout at the front of the house. They were so clogged with roof debris and pine needles and whatnot that every time it rained, water would stream over the edges and down the sides, turning our front entryway into more of a shower stall.


  • I finally managed to install the soap dispenser that came with our kitchen faucet. Probably wasn't really that big a deal, but I did have to make an extra trip to Home Depot (my second of the day).


  • We hung a mirror in the family room! Now I know THIS doesn't sound like a big deal, but it's literally the first piece of artwork or decoration that we've put up on the walls downstairs.


  • We took yet another load of garbage and recycling up to Hartland. I think this makes six? Seven?


  • Amy spent another two hours power-washing the driveway. We're about a fifth of the way done now. Good times.


  • I got started organizing the files in my office... okay, now I'm reaching. Anyway, here's a shot of the tiles actually grouted. Joy.


So, as for today's progress... well, I don't know what on the schedule. Depends on the weather and what's left on the job list for the week, I suppose. Apart from waiting around for the guy to come and give us an estimate on the gas fireplace, I really don't know what we're going to do today.

And it's kind of a nice feeling, actually.

Saturday, August 14, 2010

A partial list

I've mentioned a couple of times how everything in our new house was broken when we moved in. I'm not sure, however, that I've really managed to convey exactly what I mean by everything.

I mean, literally, everything.

EVERYTHING.

And to show you that I really do mean everything, I offer herein a partial list of all the things that WERE broken, and we've already fixed. Notice that I don't include the things we haven't got around to fixing or just throwing out yet (okay, I might bring up a few); this is only stuff that we discovered was broken and that we've actually managed to do something about. Oh, and keep in mind that I'm probably forgetting a few things, too...

(Oh, and I know I said I'd write about those mysterious vents on the roof, but I neglected to take any pictures when I was in the attic dealing with those vents, so I'll postpone that little tale for now. Have no fear, though: I have to go back up into the attic to fix something and I'll try to remember to take photos this time.)


The Roof
Well, obviously. It was by far the single greatest expense we've ever signed away, but that whole project has been pretty well covered already.


The Kitchen Tap
Beyond being a terrible design choice for the sink (we had pots that wouldn't fit under it when put into the sink, and would have to be filled sideways, and even though it had a little directional nozzle on the end, the tap was still so low that you couldn't even aim the water up the sides of the basin at all), the tap would also shoot water all over the back of the counter whenever you pushed on the faucet - like, for instance, to move it from one side of the sink to the other. We replaced all the gaskets inside the faucet the day after we moved in, and have since replaced it entirely with a much nicer tap, but that does bring us to the next point on our tour...


The Water Filter
While replacing the broken kitchen tap, I removed a rather large, blue, beat-up water filter from beneath the kitchen sink. The lines to and from the cold water supply were cracked and pretty much just in the way, so I took the whole thing out. For curiosity's sake, I opened the thing up, and confirmed that the filter probably hadn't been replaced in YEARS - the whole inside of the container was coated in scale, and the filter itself was completely brown.

Of course, the corollary to this story is that there is still some scale or something in the lines, and the fancy new kitchen faucet we bought keeps getting clogged up and slowing to a trickle. Which means I have to reinstall the water filter - a process that has already required three separate trips to Home Depot or Rona, and I still haven't found the right parts yet. I COULD get it working, but not without an extra three or four feet of water line for the water to sit and stagnate in, or a hideous kludge of pieces stuck hopefully together on one end of the line.


The Front Door
I've probably mentioned that the front door is the only non-glass door in the house that had been painted (and not just left as builder's primer), but I don't know that I've mentioned that it was broken in other ways. The latch on the handle wouldn't catch properly, meaning that if we wanted the door to stay closed, we would have to lock the deadbolt each and every time. I fiddled with the latch and the strike plate a few times and managed to get it to work with varying degrees of success for short intervals, but changes in temperature or just using it all the time would quickly make it stop latching again.

This grew wearying rather quickly, as we'd have to take our keys with us every time we went outside, even if it was just to coil up the hose or bring the recycling bins in, or else the cats would start sidling towards the open door like it was some kind of feline gravity well of danger and irresistible curiosity.

Well, given that we wanted to paint it anyway, and the weather stripping around it was cracked and ... well, broken, we finally figured out a weekend where we weren't planning on going out anywhere and took the door off its hinges so we could sand and paint it.

Fortunately, the front door came equipped with one of those fancy screens that rolls up beside the door when not in use - kind of like a sideways roll-up blind. Unfortunately, of course, it was broken (the screen was ripped along the top and bottom edges), but we figured it would at least keep the cats in while we worked on the door.

Given the excellent weather, I set up a painting station outside in the driveway, and proceeded to dismantle the door hardware. I got the old handleset and deadbolt off just fine, but when I went to remove the sweep on the bottom, I found a new and exciting reason to curse Frank's name:


I have no idea what he cut that with. It's like he had a spastic grizzly bear hold the door steady while he took a running start at it with a circular saw. The stupid bear must have kept flinching or something, because I don't think I've seen a more ragged cut in my life. I cleaned it up as best I could, and the new sweep at the bottom managed to hide it okay (barely), but I still know it's there, and it haunts me.

The door does look good now, though:


Well, okay, we still haven't painted the outside, but the new handle set is awesome, the new weather stripping has stopped the drafts, and the door at least closes properly now, without needing the deadbolt.


The Upstairs Toilet
Oh yes. Don't think I've forgotten about you, you evil piece of shit. This isn't over between us.


The Upstairs Bathtub
The drain plug in the upstairs bathtub didn't work. No matter how we jiggled, pulled, twisted, or swore at it, the drain would not seal properly. I wound up just removing the mechanism and buying a rubber plug.


The Master Bath Toilet
It's certainly not to the degree of difficulty of the other toilet, but I've already made a couple of minor fixes and repairs to the toilet in the Saddam Hussein bathroom.


The Master Bath Bathtub
Can't remember if I've mentioned this, but there's a tiny hole in the side of the tub - below where the waterline would be if one was to actually attempt to take a bath in the ridiculously shallow tub. The War Department has attempted to patch it, but the goop didn't seem to dry very well and we're not sure if it's going to hold. We'll probably just wind up not using it until we get around to renovating that whole bathroom.


The Downstairs Toilet
One of the things the home inspector pointed out to us was the fact that the downstairs toilet was leaking around the wax ring, and underneath the linoleum. We've ... well, sort of fixed it. If you count ripping everything out of the room so we can redo the entire thing.


We'll get to that eventually. Hopefully. Maybe?


The Wood-burning Stove
Actually, it's not that the stove was broken, per se, it's just that it wasn't anywhere near up to code, had never been used for anything except burning paper, and didn't sit quite level in the fireplace. So.. not really broken, I suppose, but given that it still required fixing, I think it deserves inclusion on this list. Especially given that it cost us an arm and a leg to get it working.


The Washing Machine
The first time the War Department went to put laundry in the dryer, I had to vacuum it out first because it was all full of various bits of debris. We got the clothes into the dryer and started a new load in the washing machine... which promptly started SMOKING.

We said screw it, and just bought a new set:


These Things


Frank had an entire garden full of Noma Moon Rays (or cheap knock-offs) and not one of them worked properly. A few of them would occasionally give off sort of a feeble, sickly glow, making the garden look like it was infested with radioactive fungus but most of them were full of water, broken, or both. Oh, and the wheelbarrow they're sitting in? That was broken, too.


The Garden Shed
One of the doors to the cheap-ass tin garden shed came off in my hand the second time I opened it. It took close to three hours to dismantle the doors, clean out all the debris from the tracks, replace the plastic bits that keep the doors in their tracks, and reinstall the doors.


The Window Screens
Actually, most of the screens were in pretty good shape - they just needed to be taken out and washed off - but all of the little plastic clips that keep the screens in place? Replaced. Every single one. Granted, pretty much every window was missing at least one clip, or had some form of garbage wedged into the window as a stand in, but each screen still had to get four brand new ones.


The Door Handles
Oh, man, I could write an entire post just on the damn handles for the sliding glass doors off the sunroom. Let me sum it up this way: there are three sets of doors, three different types of handle (with three different sizes and spacings of holes), and despite several trips to Home Despot, we STILL need a screwdriver to lock and unlock one of them. Oh, and when we moved in, the handle of the one between the sunroom and the living room was broken right in half - and fixed with several yards of duct tape.


The Sunroom Trim and Shade
Speaking of the sunroom, there was a sort of shade canopy thing rolled up in a corner of the sunroom when we moved in. When it started getting hot during the day, we noticed that the sunroom got pretty damn warm, and so we pulled out the shade thing to try and mitigate some of the heat. Well, the canopy was, of course, in tatters and evidence of former repairs was pretty plain, given the bits of duct tape stuck to various random bits. We also noticed that the trim to which the canopy was supposed to attach was loose and in dire peril of falling on anyone bold enough to actually try sitting in there.

So thanks to my mom and her trusty sewing machine, we got a new shade made up, and I devised a system of brackets that wouldn't put any additional weight on the trim (which we reattached using screws instead of just glue and the odd finishing nail). It's still pretty damn warm in there during the day, but with the doors on each side open for a cross-breeze, it's very comfortable. And, if I may say so, very stylish indeed:


The Outdoor Faucets
When we moved in, the faucet out front was wrapped in wet burlap (the faucet was leaking), the one in the back had been shut off completely (the faucet was leaking), and this thing on the side of the house...


...was leaking.

They're all fixed now, and yes, we kept the quail faucet. We weren't going to, but then we noticed that a) the faucet is actually well-made, solid brass, and in good shape, and b) we have a family of quails in the neighbourhood. They're really very cute.


Everything Else
Here's a sub-partial list of broken stuff that we're mostly still working on:
  • Baseboard heaters: they will all need to be replaced eventually - we've already done about half of them.

  • Light switches and wall sockets: again, we've already replaced half of them, but apart from a couple of overloaded circuits, the electrical in the house isn't TOO bad. The outside stuff, of course, is a different story.

  • Range hood fan: not broken so much as just blocked with an enormous old chunk of wasp nest.

  • Hand rail on the stairs: I "fixed" it by wrapping part of it in painters tape. Ta-da! No more goddamn splinters. Looks like hell, of course, but it'll have to do for now.

  • Window seals: the seals on the windows of the sunroom roof and the two windows in the dining room are toast, leading to condensation inside the glass. Nothing we can do but replace them, but we have to recover from the sticker shock of the roof first.

  • The faucet in the upstairs bath: not content with having the toilet borked, the shower head needing to be replaced (twice), and the plug not work in the tub, the taps on the sink faucet are also broken. There's a small cap on each of the taps that covers a little hollow. Inside the hollow is the screw that holds the tap handle and cartridge together. Both of the caps are broken and won't stay on the handle, meaning that water can get down to the screw head and rust it out. Great.

  • The side gate: the fence was built way too close the tree, and the roots have heaved up one of the panels, making the entire section useless - and pushing the end post closer to the house so the gate no longer closes properly. Yay for deer eating all the plants! Not!

  • The garage door opener: seriously - the damn thing is dialed all the way back, and it STILL manages to slam the garage door closed.


Well, that's certainly not an exhaustive list, but I think you get the picture. Next time, I'll either finish the ongoing saga of the bedroom floor, or finally get around to explaining the mysterious vents.

Or, you know, I might just have a whole post dedicated to This Week in Mayonnaise. Who knows?


Monday, July 12, 2010

How Don's brain works.. or doesn't

The following is a complete sidetrack only tangentially related to this blog...

Okay, so last week I got a question from a reader about the post where I described having to go to Canadian Tire four times in one day.

I tried to explain it as just a fact of renovations, and how the unexpected is really the expected when renovating -- especially plumbing -- but she wasn't having any of it. Truth be told, I wasn't even really buying the explanation myself, and I eventually realized I was completely full of shit.

You see, it has nothing to do with renovating one's house, or even fixing toilets, and everything to do with me. And to prove it, I offer the following anecdote. It's not really about renovations (at all), but it does go to show how my brain works, and why, just sometimes, it happens that I find it necessary to do something to make up for being an idiot - like making four trips to the same store in one day...

Last week, I finally decided it was time to do something about my worn-out shoelace. The lace on my left shoe hadn't quite broken yet, but it was getting close, and every time I laced up my shoes, I noticed it, made a mental note to replace it before it broke... and then promptly forgot about it until the next time I had to lace up my shoes.

So I was pretty pleased with myself when I remembered my stupid broken lace randomly in the middle of the afternoon, and decided to take a little break from staring at my monitor and amble down the street in the warm summer sunshine to get a pair of shoelaces. I even had cash in my wallet, and figured it would be about a ten minute round trip, tops.

When I got to the store, I realized that I couldn't remember what length my shoelaces were. No problem, I thought - I happened to be wearing the very shoes for which I wanted to purchase laces!

Rather than attempt to get the nearly broken lace out of my left shoe, I took the good lace out of my right shoe, and compared it to the ruler mounted on the wall for exactly that reason. Given that the laces I had were somewhat long, I dropped 12 inches off the end of the resulting length, and came up with a length of 45".

I grabbed two packets of laces, stuffed the old lace in my pocket, and took the new ones up to the counter. After paying for them, I sat down in one of the chairs in the store, and opened up one of the packets. You see, I had taken the lace out of my right shoe, and didn't want to walk all the way up to the office with no lace. At the same time, I didn't really want to put the old lace back in, only to have to swap it out again when I got back to work.

Fortunately, the new lace was exactly the right length, so I grabbed the rest of my stuff, and headed out to the street, figuring I'd replace the other lace, the broken one, when I got back. Right outside the shop was a garbage can, into which I tossed the old lace, my receipt, and the packaging for the first pair of laces. As I headed up the street toward the office, I stuck the other pair of laces into my pocket... where I found my old lace.

Yes, I had just thrown the other NEW lace into the garbage can, along with the receipt and the packaging. Given that I'd seen what people threw into the garbage cans downtown, there was no way I was going in to get it, so I trudged back to the office, cursing my stupidity.

When I got back to my desk, I took the broken lace out of my left shoe, and the brand new lace out of my right shoe and threw them both away.

"But Don," you say, perplexed. "Didn't you put the new lace in your right shoe right away because you didn't want to have to replace it again anyway? Why didn't you just put a new lace into your left shoe and toss the other new one?"

To which I reply because I said I bought two packets of laces. I didn't say I bought two packets of the same colour.


Tuesday, February 23, 2010

What about happiness?

When you move into an older home, and as you explore the new house and get to know its quirks and foibles, I think you can't help but start to get a sense of the people who lived there before you.

Were they packrats? Did they tend to use some rooms more than others? Did they have a tendency to delay necessary maintenance? Did the neighbours like them? What sorts of things were important to them? What was their colour and design sense like? Were they consistent in their choices?

It's amazing how these and other questions (even the ones you didn't necessarily want to ask) can be answered by the little traces they leave behind.

As you start to construct the personalities of the previous owners, I think this process becomes significantly easier - despite how hard you may try NOT to learn any more than you have to - if the person who lived in your house before you was the kind of a person to leave a LOT of clues...

In our case, the previous owner left a whole slew of things (even besides the statues) that really make us wonder just what was going through his head. For one thing, the guy was obsessed - OBSESSED - with temperature. There were no fewer than six different thermometers mounted either on the outside of the house, hanging on the walls inside, or, in at least one particular case, hanging on the wall inside with a wire lead drilled through the wall to a sensor on the outside so it could display both temperatures at once. In addition to the many thermometers, almost all of the thermostats are marked up with liquid paper, pencil lines, or even Sharpie annotations.


The amount of time he must have spent fiddling with the thermostats and heaters and comparing them to all of his thermometers and whatnot is remarkable. It's especially noteworthy when you realize that despite all of the analyzing and double-checking, he never actually replaced any of the heaters or thermostats. He seemed to be content to just make his little marks with the liquid paper and pencils and trust in his dollar-store thermometers to let him know whether it was warm enough or not.

I think another facet of the temperature obsession was something of a fixation on energy. With the exception of the three bulbs in the ghastly lamp in the hall (two of which were burnt out when we moved in), every single light in and out of the house had a compact florescent bulb in it - including all TWELVE sockets in the gruesome bathroom fixtures. The ones in the garage are particularly irksome because a) they take a couple seconds to turn on when you flick the switch, and even then they take a couple more minutes to warm up to maximum brightness; and b) we need a ladder to change them out, but there's so much crap in the garage that there's nowhere to put the ladder so we're stuck with them.

Every time we go to Home Despot, we drop off a couple of the CF bulbs in their recycling bin and buy a few more incandescent bulbs - the CFs just don't give off any light!

Frank (I figure I might as well just use his name at this point) also seemed to dislike most colors. That, or he had a violent aversion to painting anything. When we moved in, there wasn't a wall in the house that wasn't white. Well, except for the enormous mural of the mountain valley on the back wall of the garage, but that's different, and the subject of another whole post, I'm sure. Everything that was painted was painted white. The untextured ceilings were white, the walls were white, the trim was white, the doors were...

Actually, the doors aren't white. Not exactly. They're all sort of this yellowy-off-white color that's singularly unattractive. It's like teeth-that-haven't-been-brushed-in-a-week non-white. A painful non-color. As a matter of fact, they all look like they've only ever been primed with builder's primer and have never actually been painted. Which, we realized when we started taking down the closet doors so we could start on the floor, is exactly the case. Every door in the house, with the exception of the front door was installed straight from the factory and never painted.


That picture really shows the difference between the nice white trim paint and whatever botched attempt at an actual color (sun-bleached-buzzard-skeleton-yellow?) builder's primer is supposed to be.

Now it should be mentioned that Frank is by no means solely responsible for all of this - or even any of it for all we can say for certain. After all, he wasn't the original owner of the house - he may not have even been the second for all we know. Then again, we know enough from talking to the neighbours that Frank had lived in the house for at least fifteen years, so we're fairly sure we can lay at least some of the blame on his shoulders.

We also know from talking to the neighbours that Frank had a bit of bad habit in terms of letting people take advantage of him. For instance, he once paid a guy to pressure-wash the driveway and, when the guy offered, to power-wash some of the moss off the roof. One of the neighbours had to run across the street and tell the workman to stop power-washing UP against the grain of the roof and taking the shingles off along with the moss. Frank had no idea.

So it may not have been Frank necessarily - it might have been a friend, or a hired handyman, or somebody else - that spread mayonnaise all over the walls in an attempt to patch the holes left by picture hooks or whatever.


Okay, so it might not be mayonnaise, but I'll be damned if I can say for sure what it REALLY is. I thought at first it was just unsanded drywall patching compound or PolyFilla, but it's not that. Someone else suggested it might be toothpaste, as they had heard somewhere that it was supposed to work for that kind of thing, but the stuff on our walls doesn't have a minty flavor. Then someone else pointed out that it looked a lot like shiny, dried-up mayonnaise and for want of a better suggestion, that's what I'm calling it. It even shares pride-of-place with the world's most forlorn valance on the wall above the bed in the master bedroom:


It's freaking EVERYWHERE in the house. Every wall, every room, every conceivable place you could find a hole, there is one - stuffed with mayonnaise. Hell, Frank (or somebody else) even used it to seal the wire for the doorbell to the inside of the door jamb where it comes in from outside.


Apparently, mayonnaise paints up pretty nice, too, as you can see from the outside portion of that same wire.


And while we're outside, it's not really clear what we should make of this sign hanging right by the front door:


I'm not going to tell you what Frank's last name is, but I will say that it is NOT Molldara. Which maybe tells us more about Frank than his real last name would... although perhaps not as much as the stuff he left in the drawer in the master bathroom:


No, we didn't inventory that. We dumped it out into a garbage bag and scrubbed the drawer out with bleach. Twice.

This house has two fireplaces: one with a wood stove insert in the family room and the other a normal, wood burning fireplace in the living room. Straightforward enough, except.... well, the wood stove in the family room cost us almost $2000 to have it brought up to code. The guys doing the work said it looked like the only thing ever burned in it was paper. And the one in the living room, well, it sort of had an insert of its own. Behind an over-sized, brass-plated fireplace screen with glass doors was this thing:


Huh, we thought. An electric fireplace. Then we flipped it over:


I... I'm at a loss for words. Really. You just have to look at it and figure it out for yourself. The truly odd thing? Aside from hosting that electric thingy (which is now resting comfortably at the bottom of the Hartland landfill) the fireplace had never been used. For anything.

When we moved in, Frank had helpfully left four remotes for the garage door sitting on the kitchen counter. The weird thing was that each remote had three buttons on it. Obviously, the biggest of the buttons was for the garage door, but we had no idea what the other three buttons were for, or if they even worked. One of the remotes had something written on the buttons (in Sharpie, of course), but aside from "gaRagE", I couldn't really decipher what they said. One looked like "ouslde lanB", and the other was simply labeled "Fp". After thinking about it some more, and wandering around the house clicking the buttons at random, I figured it out.

"Fp" stood for fireplace. The cord from that hideous contraption up there came out from the side of the screen and was plugged into a weird device that was, in turn, plugged into a wall socket. Sure enough, the button on the remote triggered the device, and I could turn the "fireplace" on and off from pretty much anywhere - even out in the driveway.

"ouslde lanB" was a little harder. It wasn't until I noticed this ungodly scar on the wall below the front window that I realized what it was for:


Yes, that is a piece of linoleum and a metric shit ton of mayonnaise used to patch the drywall, but whatever; the important thing is that "ouslde lanB" stood for outside lamp. The third button on the remote turned the carriage lamp at the side of the driveway on and off. Oh, and just in case you were wondering, the wiring for the lamp was run through a piece of irrigation tubing buried in the front yard. No, that's not up to code, or even remotely safe, and yes, there are at least two other places where he's done the same thing for electrical service for the pumps in the fountains. (Our home inspector noticed the switches and whatnot, but Frank assured him that all the wiring had been done by a professional electrician. Shyeah, right.) I'm not even going to go into how wobbly and just plain bad the carriage lamp is (which is too bad, because it's arguably the nicest light fixture on the whole property), but suffice to say we'll be either pulling it out or redoing it.

Speaking of light fixtures, I believe I mentioned in my first post that the ghastly thing in the hall was the second-ugliest light fixture in the house. While there's absolutely no question about which fixture is the ugliest, there's some debate about the third-ugliest. So how about we put it to a vote?

The War Department gives the bronze medal for ugliest to this pair of flying saucer-inspired pieces of shit in the family room:


The only light those bastards give off is straight down; they seem to be utterly incapable of illuminating a closet, let alone a family room.

That's a solid contender, I must admit, but I still say the bronze should go to this abomination from the design-hell that was the mid-eighties:


That thing wouldn't even look good with incandescent bulbs in it; with the CFs, it's enough to make you shut your eyes and wish it would just go away. It never does, though. Oh no, it's always still there.

Judges?

Oh, and while we're talking fixtures, let's discuss plumbing fixtures for a second. I've alluded to this several times, but it really does need to be seen to be believed. Without further ado, I present to you a master bath, inspired by Saddam Hussein himself:


Those accessories had to be put in purposefully and deliberately, by the way: the tiles by the window had to be replaced, and a hole cut into the ceiling of the family room underneath just to install the taps and drain for the tub. (And yes, that's the same master bath that had the carpeted floor.)

So what have we really learned about dear old Frank? I can't say; I'm too busy worrying about what the new owners of OUR old house have figured out about US.

Anyway, I could go on and on here, but this post is already in the running for most excessive ever, so I'll just close with one last thing. I'm not going to offer any comment on this; I'm presenting it merely as it is, a disturbingly existential pondering encapsulated on a clear plastic label, affixed firmly to a drawer in the kitchen: