Saturday, December 14, 2019

Woodworking Project: Bent Bookcases (Part 3)

(...continued from part 1 here and part 2 here)

So before I got too far along in the finishing process, I made up a sample board for The Client so she could compare a few of the available finishes:


Much to my everlasting glee, she opted for my all time favorite finish: Danish oil with a poly top-coat.

I did decide to use some gel stain on the backs, as I kind of wanted them to be dark so they'd tie in with the edge banding. I gotta say: this stuff is great! It goes on really easily, it penetrates evenly across the wood, and doesn't raise the grain at all. My only real issue is that it didn't seem to get any darker with a second application, so I kind of wasted some time and stain there, but thems the breaks.

I did use a wood conditioner first, and it certainly seemed to help as I didn't get any weird blotchiness, even though the wood was pretty pale for such a dark stain. (General Finishes "Candlelite", for the record. Highly recommended.)


And then it was just a matter of putting down two coats of Danish oil and three coats of wipe-on poly, with a little steel wool burnishing in between. (This picture represents about two weeks of dust and fumes, three foam brushes, and a half-dozen rags.)


And then they were done.

Finally.

Here are a whole bunch of pictures.


And this is what they looked like in her living room, waiting for some books.


This was an insanely challenging project and I loved every minute of it. (Except for that first attempt at a glue up. That sucked.)


Wednesday, December 11, 2019

Woodworking Project: Bent Bookcases (Part 2)

(...continued from part 1 here)

At this point, I had finally figured out how I thought I would handle the bent splines, so it was time to assemble the carcasses. I got the jig ready, got out pretty much every single clamp I owned, ran rehearsal several times to make sure I had the process down, and then started gluing everything together.

Half an hour later, I was ready to throw the entire project in the trash.


That's what the shop looks like after you've messed up your math again, and have to get everything out of the clamps but the glue's already started curing and it's so damn stupid and frustrating that you have to throw one of the pieces across the garage and just call it a night because everything sucks. Yes, I threw my hat on the floor and yes, I probably said a few bad words.

And all because my lousy math skills burnt me yet again. When working out the final length of the shelves, I had only subtracted the depth of ONE dado, instead of both. The damn shelves were three-eighths of an inch too long, and the carcass wouldn't square up or stay tight at the miter joint.

So I gave it a couple of days and then came back to pick up the pieces. I made a few repairs where I could (though the back edge of one of the side pieces has a flaw that I will always, always know is there) and cut the shelves down to their proper length.

The second attempt at the glue up went much more smoothly, and I managed to finally assemble the carcasses.


And then it was time for some splines!

I did the splines in the miter joint first (because they were fun and easy and I kinda needed a quick win after that horrible glue-up), and then moved on to the bent ones. I had originally planned to use a circular saw to make a slice across the kerf cuts on the inside of the curve (while the board was still flat) so that the splines would be hidden and only visible on the inside. But, keeping the saw straight was going to be really tough, given the length of the cut, and the splines were going to be a very weird shape as well. I was also a little worried about sanding through the veneer on the inside curves when trying to get the splines properly flush.

Given that I already had visible splines in the miter, I figured that having visible splines on the bend would be kind of a neat detail. So I spent a fair amount of time trying to work out how to raise the blade on the table saw through the material in a consistent, repeatable way that didn't also result in weird ass-looking splines. In the end, I beefed up my crosscut sled with some aftermarket parts and went with a simple straight pass over the blade.

It looked scary and it was scary.


This let me use essentially a straight piece of sapele as the spline. I just traced out the pattern for each spline, cut it out on the band saw, and then sanded them down to fit each slot individually before gluing them in place.


As you can see, they're pretty big splines, but that's good. They bisect all of the kerfs, and provide lots of stability and - more importantly - gluing surface area.

It was about this time that I started my experiments with steam bending. I was still hoping to be able to bend the edge banding around that curve, but was also still thinking about how I would handle it if the bending didn't work out. (I think I kinda knew, you know?)

Anyway, I spent the next month futzing about with the steam cannon before coming to the somewhat foreseeable conclusion that I wasn't going to be able to bend the edge banding. I had to work out a way to get edge banding on those corners and to absolutely no one's surprise, my solution involved splines!

I somehow failed to take any pictures of this, but anyway: I planed down my very last sapele plank to size, and traced the shape of the corner onto it four times. I laid it out so the grain was running diagonally across the corner (man, pictures would help here, eh?) and then cut out the pieces on the bandsaw. I sanded them down close to final size, trimmed them to length, and then cut a notch in each end - and a matching notch in several other pieces of edge banding.

It was about this time that my dad showed up for his annual visit where he goes to see his doctor and his doctor tells him to go away and come back next year. It was good timing as I got to take a week off work and he got to help me out with the edge banding.

Here's why I cut the notches in the corner pieces and the edge banding, by the way:


WAY easier than a scarf joint, much stronger, and a nice little detail besides. Now all we had to do was repeat it several times over the course of two days:


Once all the edge banding was glued up and dry, it was time to trim it flush.


This was all going really well until I made a somewhat overly aggressive cut while going around one of the bends and tore out a great jeezly chunk of wood. On the front, outside edge. Of course.


Not gonna lie. This was another one of those "Well, there goes THAT project!" moments. I couldn't think of a way to fill that nasty scar with anything that wasn't going to stick out like a sore thumb. I toyed with the idea of making it as obvious as possible, and going for some kind of distressed, rustic approach to the whole thing, but that just wasn't going to play with the design at all.

Instead, I stepped away for a couple of days (okay, I did some more sanding while I thought about it), and then emailed my old woodworking instructor for advice. Much to my surprise, he responded almost the same day with a few incredibly helpful suggestions, and a few tips on the methods he'd use to fix it.

Working with his advice, I came up with a way to repair the damage and the key to the fix turned out to be how I'd so "thoughtfully" oriented the grain on an angle across the curve (ironically, it was this same orientation that caused the tear out in the first place). I started by scoring a line along the grain, right across the corner, and then chiseled away all of the material on the outside of that line.


Then I took a piece from the same board (not just the same board, actually, but the piece I cut off the board immediately beside the piece I was fixing), got a nice clean edge on it at the table saw, and glued and clamped it into the gap.


Once the glue had properly cured, I carefully trimmed it flush again, and it looked - even if I say so myself - perfect:


Then all I had to do was cut the rabbet in the edge banding on the back sides, square up the corners with a chisel, cut and sand the backs, add splines to the mitered corners of the edge banding, and then sand, sand, sand, and sand.

Then it was time for finishing!

Which I will tell you all about in Part 3.


Tuesday, December 10, 2019

Woodworking Project: Bent Bookcases (Part 1)

A friend of ours did us a solid, and looked after our idiot cat while we were lying on a beach in Maui back in February, so as a small part of saying thanks, I offered to build her a bookcase for her living room and she eagerly (a little TOO eagerly) accepted and agreed to pay the material costs.

The only real guidelines I had were what the overall dimensions needed to be - she wanted a bookcase that would fit behind her couch, so 3 feet high and six feet long - and she would prefer, if at all possible, that the final design include some kind of curve.

Really, up until the curve part, this was sounding super easy, right?

I did what I usually do in these situations and turned to the Internet for inspiration. I found a few videos where people had successfully created curves in plywood (and other materials) using a technique called 'kerf cutting'. It's pretty simple, really: you just make a series of parallel cuts not quite all the way through the wood, and then you gently make it round. I ran a few tests and sure enough, it works just like you'd think:


The neatest part of this was figuring out that you can adjust the radius of the corner by increasing or decreasing the space between the cuts. (Turns out there's a calculator online that you can use to work it out, but it was way, way, WAY too mathy for me - I just made a bunch of test cuts. Okay, a LOT of test cuts.)

After playing around with a few ideas, I came up with a design consisting of two separate units, each more or less square, that could be placed next to each other, and with a curved top on the outside end of each one.

I know that sounds weird, so here's what they were supposed to look like when I was done:


Of course, the other advantage to this design would be if she decided to move them somewhere else, she could put the curved corners together instead of the squared ones, or separate them by a couple of feet and stick a plant in between, or even just have matching bookcases on the opposite sides of a room (or doorway, which I think would be seriously cool).

The design called for pretty standard construction - plywood carcasses, hardwood edge banding, dadoes for the bottom shelf, and adjustable middle shelves. The real challenge here was going to be that curve, and how to conceal the plywood edge on the other top corner joint. Usually, you'd be able to add a little extra edge banding here and there to cover it up (like the other bookcases I made way back when), but because I wanted to keep the edges clean and a uniform thickness, I wouldn't have that luxury. I eventually decided on a miter joint which, even though isn't the strongest in the world, would allow me to use splines, which are my favorite things.

Then it was off to Windsor Plywood to pick up materials, and where I made the first (and most costly) of several mistakes in this project. They had some beautiful sapele on sale, which was perfect for the edge banding, and some really cheap "Baltic birch" plywood  - only $40 for a 4x8 sheet! I bought what I thought I would need and brought it all home to start roughing out the cases.

Oh, but first, I made a jig! (I got to make SO MANY jigs for this project. It was awesome.) Possibly the largest jig I've ever made, and it worked (eventually) like a hot damn. Of course, moving it around the garage every day for six months sucked, but hey.


I cut all the plywood down to rough size for the various shelves and whatnot, and grabbed an offcut to test the saw set up before making the kerf cuts for the bent corners. Which is when the truth of that old adage was brought home in all its truthiness: you get what you pay for. That plywood was absolute garbage. Just trash. It didn't bend so much as just explode in my hands.


On closer inspection, yeah, I probably should have known. Look how thin that top layer of veneer is, compared to decent (actual) Baltic birch:


Needless to say, it was back up to Windsor plywood for a couple new 4x8 sheets of proper birch and a little more sapele as I'd underestimated the requirements just a little (as usual). Suffice to say that the new stuff was a bit (3 times) more expensive, but so, so, so much better quality.

After cutting down all of the new plywood into appropriate finished sizes, I began conducting some glue tests. The good news was that the actual Baltic birch worked like a dream, and I was able to refine my cuts and create the first real mockup:


The bad news was that the glue I was planning on using was not so good. See, I was going to use Gorilla glue which, being a polyurethane glue, expands much like insulating foam to fill any gaps in your joints. The problem is that once expanded, Gorilla glue has absolutely no holding power at all. The expansion really only works to fill minor flaws - not when trying to fill in a gap of a good 1/8th of an inch. The even worse news was that while Titebond III, my old standby, was certainly better, it wasn't a whole lot better.

I started to get a little bit worried about my design at this point, to be honest. I knew that, sooner or later, at some point someone was going to try and shift one of the bookcases slightly or try to move it outright and it was probably going to be full of books at the time. With a miter joint at one end and a curve that relied on removing a whole lot of material at the other, if that someone happened to pick it up by the top, the entire thing was likely to tear apart. If I was going to have any structural stability in the tops of these things at all, I was going to have to revise my design.

So I came up with a two-fold solution: first, I was going to glue in the top shelf using dado joints, just like the bottom shelf, leaving only the middle shelf adjustable. This would provide some rigidity and stability right near the top, where it was most important. Second, I would have to come up with some type of spline arrangement within the bent corner as well. I wasn't entirely sure how that was going to work, obviously:


But I felt pretty confident I could figure something out. In the meantime, it was on to the dado-ing!

I spent WAY too much time faffing about with a couple different designs of router-based dado jigs before throwing them all in the trash and going back to old reliable: chucking the dado stack in the table saw.


And even though the length of the boards was a little tricky, it worked!


Then I got to use one of my fiddliest jigs, the shelf pin drilling template:


After that, I couldn't really put it off any longer. It was time to stop making test cuts, and just bend the damn wood already:


Much to my delight and amazement, the jig worked perfectly. The bend happened in exactly the right spot, the kerfs closed tight without splintering, and the pieces even came out square. I managed to sort of impress myself, actually.

After they dried up, it was a relatively simple matter to (carefully!) cut them to length and miter the end at the same time. Considering how many things had to go exactly right for them to line up this way, I was absolutely ecstatic at how they turned out. They were virtually identical:


I did put in some biscuits in the miter joint for added strength, and cut a couple of really interesting gouges in my work top at the same time, just as an extra reminder of why I need to not get cocky.

Spoiler alert: this was not the last time I got this reminder during this project. But this blog post is getting too long already and starting to bog down the editor with all the pictures.

But fear not - Part 2 is right here.

Sunday, October 6, 2019

Adventures in wood bending

My original title for this post was "How NOT to build a steam box". Still not sure I went with the right one, but whevs, as the kids are saying. (I think it needs more ... spelling. Like, maybe "whyevfs". Or maybe less? "wfs"? Meh.)

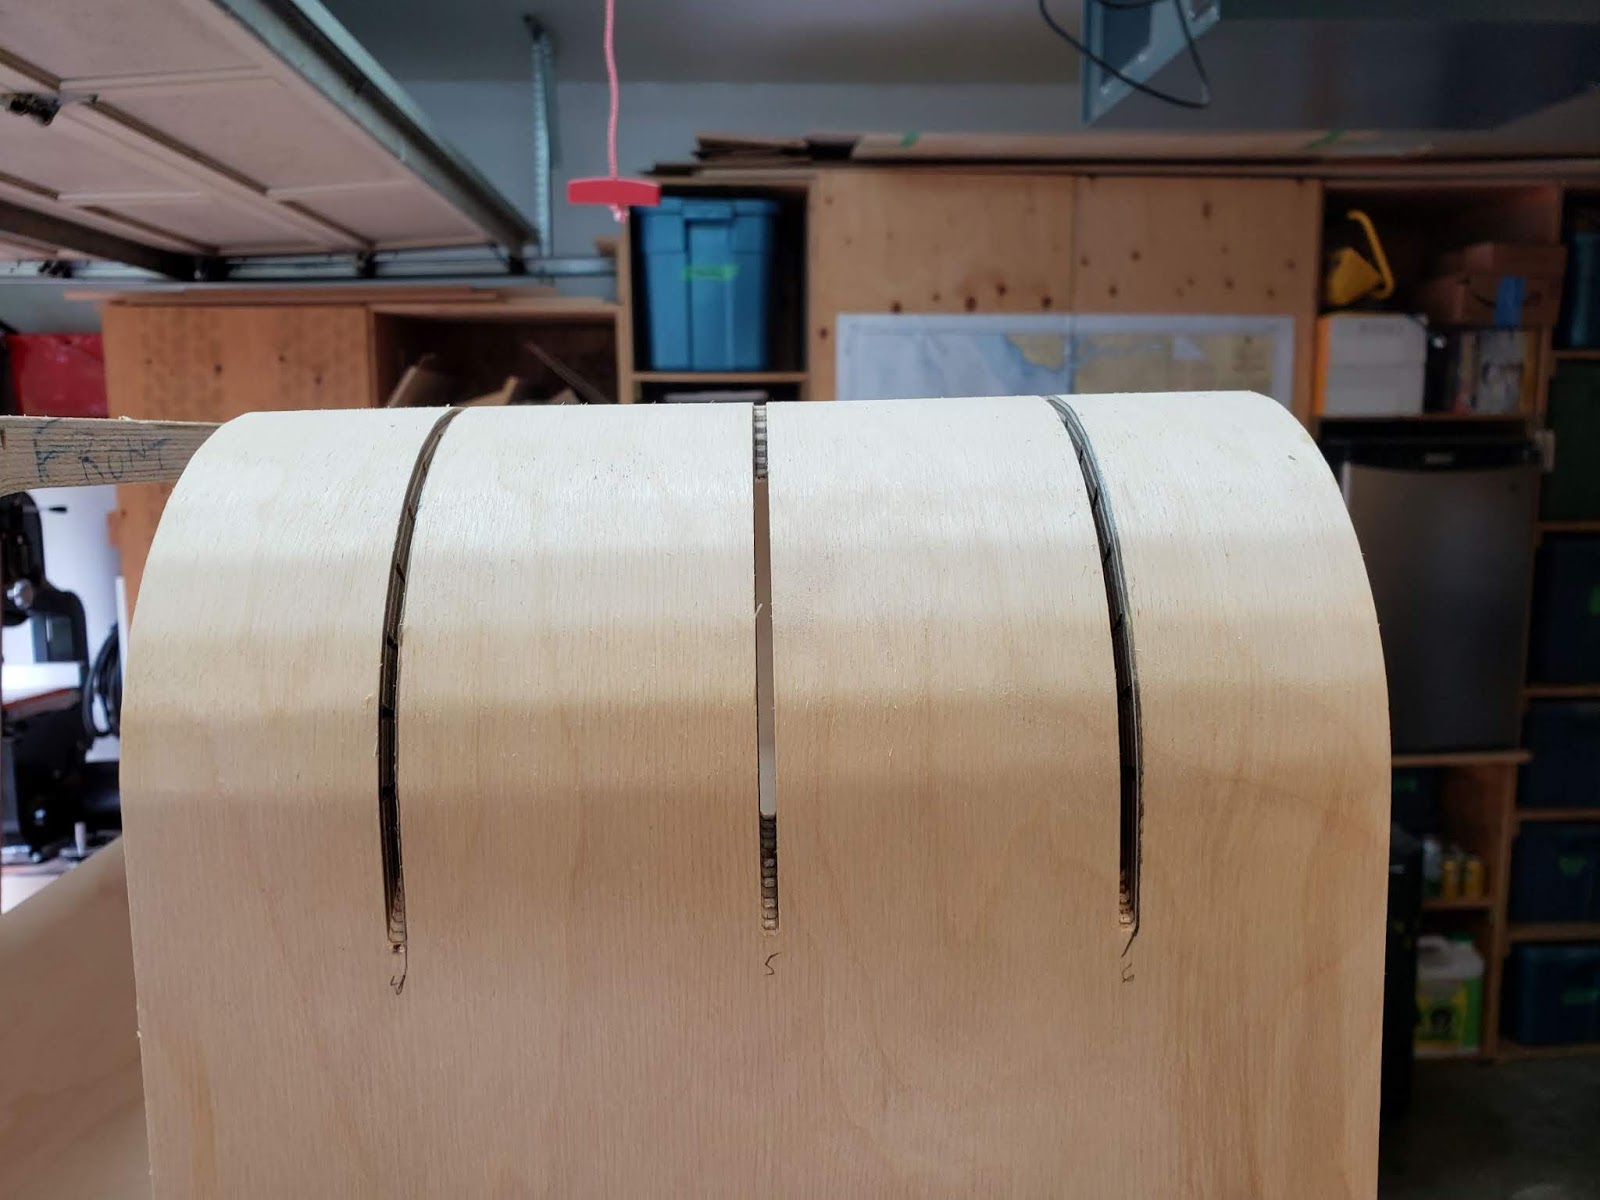
Anyway, I'm currently working on some bookcases for a friend, and like EVERY project, I just had to go and make them complicated. The "client" needed a bookcase to go behind her couch, and really wanted a curve involved somehow. And, long story short, I needed to come up with a way to bend the edge banding to go on the faces (and backs) of the case.

I'll have a post about the project as a whole when I'm done, but wanted to vent (ha! Vent! Get it? Oh, no, wait. I should have saved that pun for the end. Sorry.) about this particular part. Mostly because I've been posting pictures to Facebook and there are a LOT of very confused people out there.

So the concept of bending wood is pretty straightforward: put the wood you want to bend in some kind of container, fill the container with nice hot steam, and wait for a couple hours or so. Then you take the wood out, clamp it in the shape you want it to stay and let it dry. Presto bendo!

I watched a couple of YouTube videos and took note of the ones that seemed to work, and then set out to bend some wood.

My first challenge was to come up with some kind of heat source. Fortunately, our barbecue has a side burner (which we've used exactly twice). If I could set up a steam box in the back yard, I could boil a big ass pot of water on the barbecue and wouldn't have to worry about running out fuel, thanks to the natural gas line.

The next part was to come up with a steam box. I saw quite a few people build theirs out of plywood, but I watched one enterprising fellow build his out of a length of heavy plastic pipe. I figured that was faster and slightly cheaper than the plywood option, and hied off to the plumbing supply store. I got a 10' length of heavy-duty PVC drainage pipe (I cut a couple feet off just to make it slightly less unwieldy) and a couple of end caps to help seal the steam inside. I drilled pairs of holes every eight inches or so, just slightly below center, and ran dowels through to give me something to rest the wood on. I even grabbed a cheap temperature gauge and attached it near the venting end of the pipe so I could have an idea of the temperature inside the pipe without having to open the cap all the time. (And I remembered to drill some drain holes at the low points to make sure the condensation build-up had a way to get out, and that the pipe wouldn't get too pressurized. Yes, I was that deluded - pressure! Ha!)

With that taken care of, I needed to find a vessel in which to boil the water for to be making with the steam hot. Finding a steel bucket proved to be a lot harder than I thought it would be, but my Crazy Neighbour came through as he usually does, and found a metal bucket that wasn't rusted too badly. I fashioned a top for the bucket out of a piece of plywood and some little c-clamps, and figured that would hold well enough for a proof of concept.

It's worth pointing out that I was still labouring under the impression that all of this was going to work on the first try. Faithful readers, you already know I was wrong.

So I had a heat source, a vessel, and a steam chamber. The next problem was getting the steam from the bucket into the pipe. After casting around a bit and checking out the usual suspects, I found a deal on a replacement shop vac hose. I figured it was probably a little bit long, but my main YouTube inspiration (he of the plastic pipe steam chamber) had a great jeezly long feed pipe and his set-up seemed to work out just fine.

I attached one end of the shop vac hose to the plywood bucket lid, ran the other end in through the end cap of the PVC pipe, and threw together a couple of quick stand-offs to support the pipe on the sawhorses beside the barbecue. And I had myself a steam box!


It took a little while, but the water in the bucket eventually started boiling, and steam began making its way into the shop vac hose which, catastrophically weakened by the boiling hot vapour inside, promptly collapsed upon itself and started to melt.

Back to the drawing board!

(The good news is that the shop vac hose is the same size as the one on our shop vac and, after a minimum of careful trimming, we now have a back up hose should ours ever get run over by the car. Again. But that's another story.)

For take two, I abandoned the frailty of the plastic shop vac hose and went to something that was a little more purpose-built for moving hot air: dryer vent!

A quick re-jiggering of the bucket lid and a little hollowing out of the end cap, and Take Two was up and running later that day.


Man, that dryer vent got hot! Whew!

Unfortunately, the inside of the PVC pipe did not. Time to reconsider.

I did a little more research and thinking, and came to the conclusion that the steam just wasn't getting into the pipe fast enough. The dryer vent was so big, and so poorly insulated, that the steam was cooling off about halfway through, and nothing of any significant temperature was reaching the chamber.

I decided I needed two things: a narrower gauge transfer pipe between the bucket and the steam chamber, and a way to get the steam into the transfer pipe faster. It took some online shopping and perseverance (and mutilation of the most beautiful gas can I'd ever seen), but I managed to accomplish both.


The gas can works better because the steam has nowhere to go except through the narrow opening. With a vigorous enough boil, the steam is forced into the transfer pipe (a piece of flexible exhaust pipe for a motorcycle) quite quickly. I also moved the entry point for the steam into the middle of the steam chamber so that both ends would heat evenly, and the heat would be concentrated in the center of the wood, which is where I needed it to bend.

Yep, all in all, a much better set up than my first two attempts. In the end, it wasn't any more successful, though. The side burner on the barbecue just wasn't powerful enough to get the water really boiling. It only reached a gentle simmer, not the high rolling boil that I needed. No boil, no steam:


I was pretty much at the end of my rope at this point, and ready to just cut the bends out of a plank on the bandsaw, but I was convinced to give it one more go. Mostly because we're going to have to do some wood bending if we're going to restore our canoe, but partly because I wasn't going down without a fight on this one.

So I ordered a turkey fryer propane burner and reassembled the entire monstrosity in the front driveway.


(The neighbours were.... well, "intrigued" might be under-selling it. Let's go with "concerned".)

But damn me! It worked! We got steam!


The set up required some further tinkering, of course. After about 45 minutes or so, the transfer pipe started making a weird kind of chuffing noise. I poked around a bit, and figured out that the lower bend was full of condensate. I drilled a small hole right at the low point and once it finished draining, the noise stopped and full steam resumed.


Oh, hey! I bet you didn't know that PVC pipe will start to lose structural integrity right about 250 degrees F!

Yeah, I was getting some serious droopage. I hauled out a few extra sawhorses and roller stands to shore it up as best I could, but I was starting to think that I wasn't going to get a second shot at it out of this particular rig.


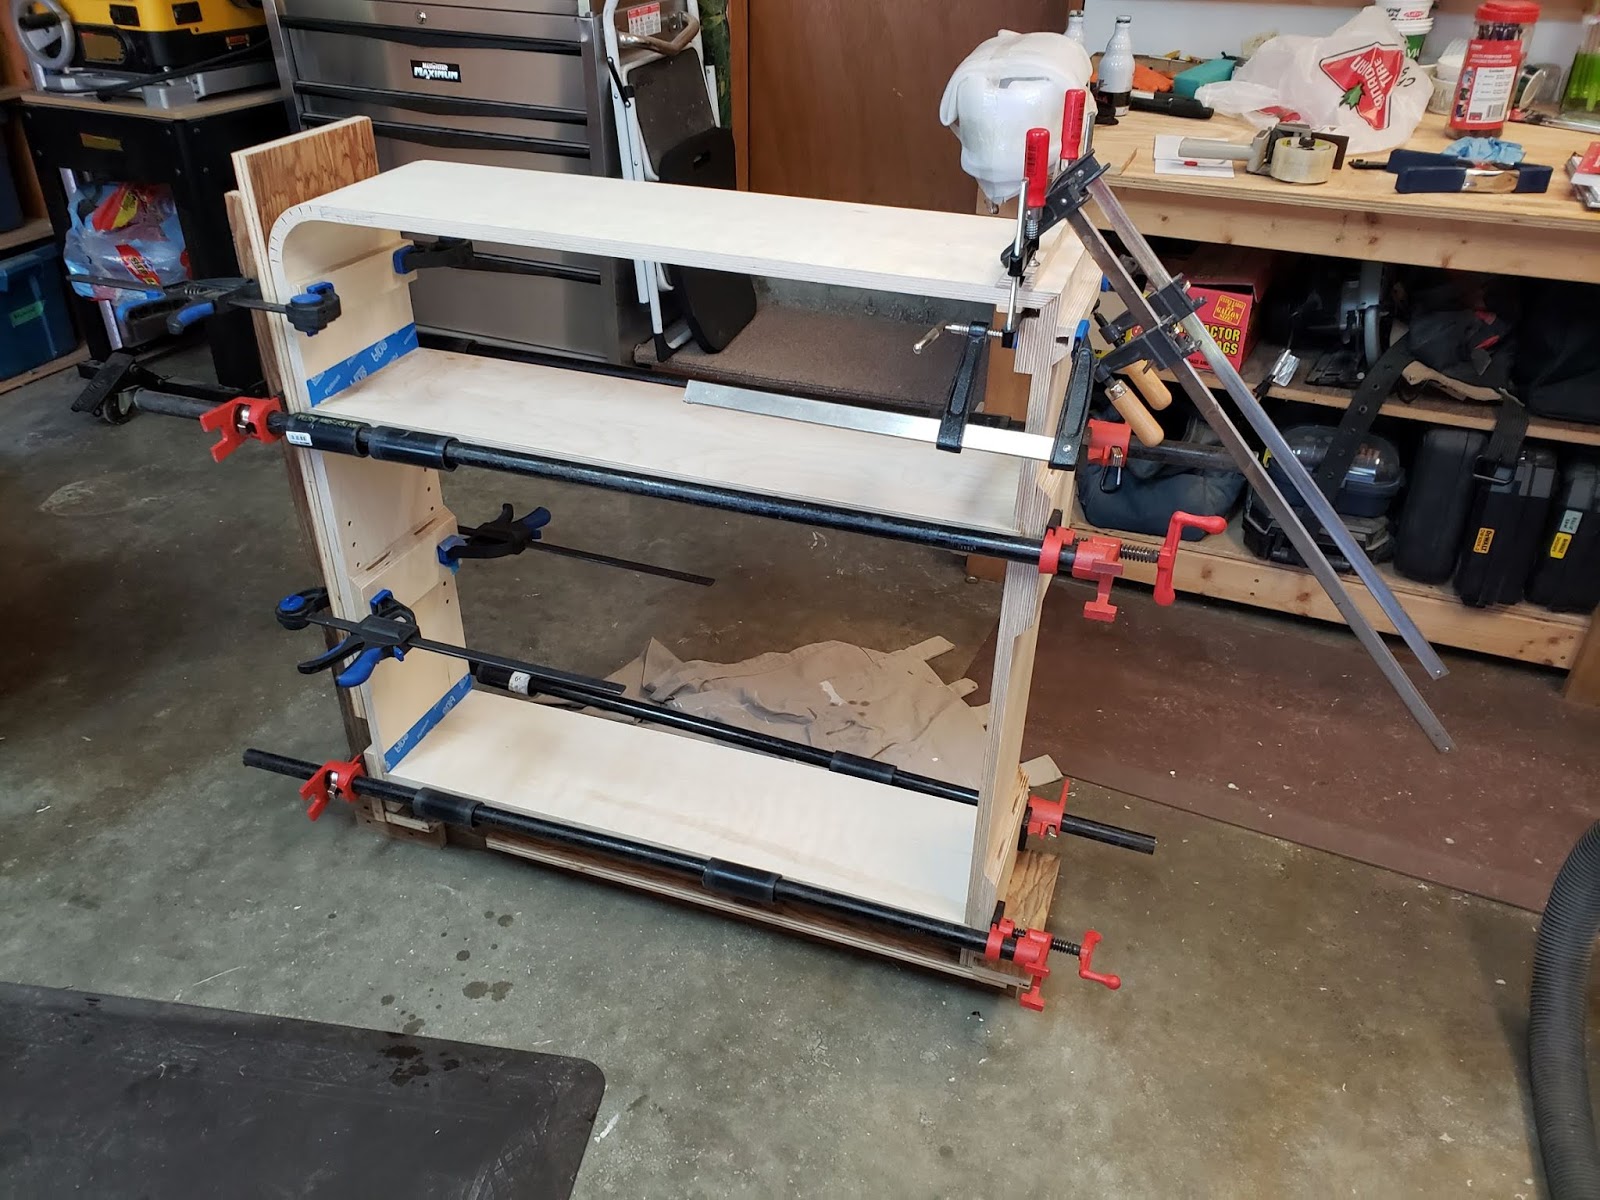
But I had a pipe full of steam, the wood was getting nice and toasty and I was going to give it a serious go. I set up my bending jig in the workshop and made sure I had a clear path between it and the steam chamber.


After almost two hours, I decided I'd see if the wood was at least close to bending. It was not.


I probably could have left it in longer, but really, I wasn't getting that curve out of it without the wood being 90% moisture, and I was worried I was going to run out of propane as it was. I had probably also failed to plan for how much the wood was going to twist as I was bending it. I would have had to have kept it in the jig for hours and I only had one jig - and four pieces that needed bending.

So, yeah. After all that, I had nothing to show for it except a badly misshapen length of PVC pipe and some slightly damp pieces of sapele.


The next time, I'm just making the box out of plywood, damn it.